This tutorial introduces the MidiMessage class, which is used for representing MIDI data. The MidiBuffer class is also introduced for handling buffers of MIDI messages.
Beginner
Windows, macOS, Linux, iOS, Android
MidiMessage, MidiBuffer, Time, Timer
Getting started
- Note
- This tutorial assumes that you are familiar with MIDI in general. You should also be familiar with using JUCE buttons and sliders (see Tutorial: The Slider class and Tutorial: Listeners and Broadcasters).
Download the demo project for this tutorial here: PIP | ZIP. Unzip the project and open the first header file in the Projucer.
If you need help with this step, see Tutorial: Projucer Part 1: Getting started with the Projucer.
The demo project
The demo project presents four buttons to create MIDI messages on MIDI channel 10. These buttons create note-on messages for four of the standard (General MIDI) drum sounds: bass drum, snare drum, closed hi-hat, and open hi-hat. There is also a slider that creates a volume controller message (continuous controller 7). The interface is shown in the following screenshot.
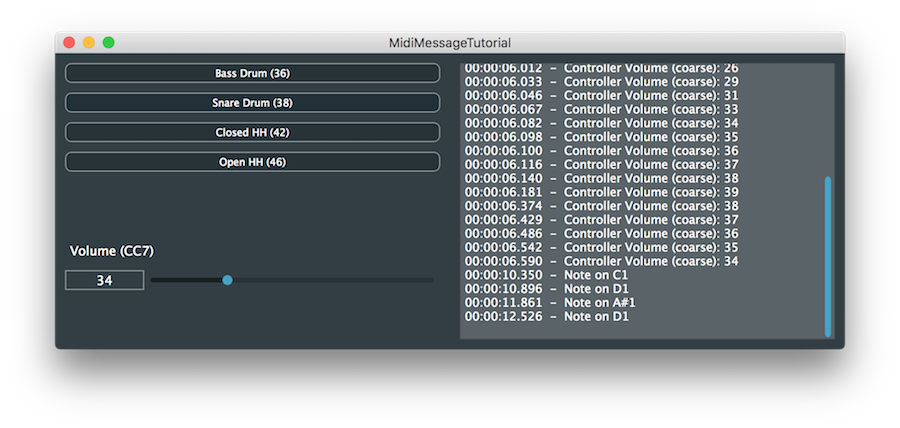
Drum pad buttons and a volume slider
The panel on the right-hand side displays the list of MIDI messages than have been generated, along with a timestamp (relative to the time that the application was launched).
- Note
- The application doesn't send any MIDI data, or make any sound, it only displays the MIDI data.
The MidiMessage class
This tutorial illustrates the code required to create some MIDI message types. It also includes some code to parse most MIDI message types. In general, the MidiMessage class contains a range of static member functions for creating MidiMessage objects (for example the MidiMessage::noteOn() function for creating note-on messages). There are also a range of member functions for querying and accessing MidiMessage objects (for example, the MidiMessage::isNoteOn() and MidiMessage::getNoteNumber() functions).
Creating MidiMessage objects
Have a look at the public static member functions for the MidiMessage class. This lists all of the functions for creating different types of MIDI message. You can also create MidiMessage objects from the individual bytes or raw data but these must be valid MIDI messages according to the MIDI specification. (An assertion will be generated in a debug build if you create an invalid MidiMessage object.)
- Note
- MidiMessage objects should normally be stored as local or member variables and passed by value.
To create a note-on message use the MidiMessage::noteOn() function. This needs the MIDI channel (numbered 1 .. 16), the note number (0 .. 127), and the velocity (as a uint8 value 0 .. 127). Alternatively, the velocity can be expressed as a float value which will be converted to 0 .. 127 internally (rounded to the nearest integer).
- Note
- A note-on with zero velocity is actually a note-off message so note-on velocities are in the range 1 .. 127 (which makes the minimum floating-point velocity for a note-on around
0.004f). There is also the MidiMessage::noteOff() function for specifically creating note-off messages that also allows you to specify a note-off velocity (which is recognised by some synthesisers).
In our demo project we create a note-on message with velocity of 100 and a different note number depending on which button was clicked:
void setNoteNumber (int noteNumber)
{
auto message = juce::MidiMessage::noteOn (midiChannel, noteNumber, (juce::uint8) 100);
message.setTimeStamp (juce::Time::getMillisecondCounterHiRes() * 0.001 - startTime);
addMessageToList (message);
}
Notice that the noteNumber value is set by one of our buttons and gets passed to the setNoteNumber() function. We also need to cast the value 100 to the uint8 type. If we don't do this then there is a compiler ambiguity regarding which of the versions of the MidiMessage::noteOn() function should be called.
Setting the timestamp of a MidiMessage is optional but it's very useful for keeping track of the time that events were generated or received. The default timestamp is zero and the time units of the timestamp are not defined. In general, it is up to the application to decide what time units to use. In this simple case we are using seconds as the units by obtaining the current time using the Time::getMillisecondCounterHiRes() function and multiplying by 0.001 (and subtracting the time that the application started so that this is relative to that point in time).
The volume slider is used to create a continuous controller (CC) message. CC7 is the the volume control change message:
volumeSlider.onValueChange = [this]
{
auto message = juce::MidiMessage::controllerEvent (midiChannel, 7, (int) volumeSlider.getValue());
message.setTimeStamp (juce::Time::getMillisecondCounterHiRes() * 0.001 - startTime);
addMessageToList (message);
};
Parsing MidiMessage objects
Our addMessageToList() function parses the timestamp and the MIDI message so that it can be displayed in the list of messages in our interface:
void addMessageToList (const juce::MidiMessage& message)
{
auto time = message.getTimeStamp();
auto hours = ((int) (time / 3600.0)) % 24;
auto minutes = ((int) (time / 60.0)) % 60;
auto seconds = ((int) time) % 60;
auto millis = ((int) (time * 1000.0)) % 1000;
auto timecode = juce::String::formatted ("%02d:%02d:%02d.%03d",
hours,
minutes,
seconds,
millis);
logMessage (timecode + " - " + getMidiMessageDescription (message));
}
The getMidiMessageDescription() function actually parses the MIDI data to get a human-readable description of the message.
static juce::String getMidiMessageDescription (const juce::MidiMessage& m)
{
if (m.isNoteOn()) return "Note on " + juce::MidiMessage::getMidiNoteName (m.getNoteNumber(), true, true, 3);
if (m.isNoteOff()) return "Note off " + juce::MidiMessage::getMidiNoteName (m.getNoteNumber(), true, true, 3);
if (m.isProgramChange()) return "Program change " + juce::String (m.getProgramChangeNumber());
if (m.isPitchWheel()) return "Pitch wheel " + juce::String (m.getPitchWheelValue());
if (m.isAftertouch()) return "After touch " + juce::MidiMessage::getMidiNoteName (m.getNoteNumber(), true, true, 3) + ": " + juce::String (m.getAfterTouchValue());
if (m.isChannelPressure()) return "Channel pressure " + juce::String (m.getChannelPressureValue());
if (m.isAllNotesOff()) return "All notes off";
if (m.isAllSoundOff()) return "All sound off";
if (m.isMetaEvent()) return "Meta event";
if (m.isController())
{
juce::String
name (juce::MidiMessage::getControllerName (m.getControllerNumber()));
name =
"[" + juce::String (m.getControllerNumber()) +
"]";
return "Controller " +
name +
": " + juce::String (m.getControllerValue());
}
return juce::String::toHexString (m.getRawData(), m.getRawDataSize());
}
- Note
- The same functionality is already available through the member function MidiMessage::getDescription(). We do not use the ready-made implementation here but implement it ourselves to illustrate how to work with MIDI messages of different types.
This function attempts to parse all types of MIDI message (even though we have only looked at creating note-on and controller messages so far). Here you can see the recommended method of accessing the data in a MidiMessage object:
- determine the type of MIDI message (using one of the functions that start with "is"); then
- use appropriate functions for accessing that type of MIDI message.
We would only reach the final line of this function if the message was a system message (system exclusive, for example). You can access the raw data of any message using MidiMessage::getRawData() but generally it is easier (and more readable) to use the range of built-in functions for most purposes.
- Warning
- Using functions to access data in a MidiMessage for messages of the wrong type will lead to errors. For example, the MidiMessage::getNoteNumber() function will return a value from any MidiMessage object but this doesn't confirm that the message is either a note-on or note-off message. You must check first with one of the functions MidiMessage::isNoteOn(), MidiMessage::isNoteOff(), or MidiMessage::isNoteOnOrOff().
- Exercise
- Modify the
getMidiMessageDescription() function so that it lists the velocity of note-on messages. Check the API reference to find out which function you should use.
The MidiBuffer class
One problem with our demo application is that it doesn't create note-off messages. We are just creating MIDI messages intended for percussion sounds, so this doesn't seem like a big problem. But, it's bad practice not to create note-off messages for corresponding note-on messages (with sustaining sounds it will lead to stuck notes).
We could just add a note-off immediately following the note-on in the setNoteNumber() function:
auto message = juce::MidiMessage::noteOn (1, noteNumber, (
uint8) 100);
message.setTimeStamp (juce::Time::getMillisecondCounterHiRes() * 0.001 - startTime);
addMessageToList (message);
auto messageOff = juce::MidiMessage::noteOff (message.getChannel(), message.getNoteNumber());
messageOff.setTimeStamp (juce::Time::getMillisecondCounterHiRes() * 0.001 - startTime);
addMessageToList (messageOff);
unsigned char uint8
A platform-independent 8-bit unsigned integer type.
Definition juce_MathsFunctions.h:52
We could even change the timestamp of the note-off message (for example 0.1s after the note-on message) but this won't change when the messages are posted to the list:
auto message = juce::MidiMessage::noteOn (1, noteNumber, (
uint8) 100);
message.setTimeStamp (juce::Time::getMillisecondCounterHiRes() * 0.001 - startTime);
addMessageToList (message);
auto messageOff = juce::MidiMessage::noteOff (message.getChannel(), message.getNoteNumber());
messageOff.setTimeStamp (message.getTimeStamp() + 0.1);
addMessageToList (messageOff);
The MidiBuffer class provides functions for iterating over buffers of MIDI messages based on their timestamps. To illustrate this we will set up a simple scheduling system where we add MidiMessage objects with specific timestamps to a MidiBuffer object. Then we use a Timer object that checks regularly whether any MIDI messages are due to be delivered.
- Warning
- The Timer class is not suitable for high-precision timing. This is used to keep the example simple by keeping all function calls on the message thread. For more robust timing you should use another thread (in most cases the audio thread is appropriate for rendering MidiBuffer objects in to audio).
Add some members to our MainContentComponent class:
juce::MidiBuffer midiBuffer;
double sampleRate = 44100.0;
int previousSampleNumber = 0;
- : The MidiBuffer object itself.
- : The MidiBuffer class uses samples as the units for the timestamps of MIDI messages. Although we are not generating audio we need to choose something to use as the sample rate. We use this member to store the sample rate. (We use 44,100 since this is a common value.)
- : We need to keep track of which timestamp we have already reached within the MidiBuffer. We use this member to store the this timestamp in samples.
Adding MIDI messages to a MidiBuffer object
Instead of adding our MIDI message directly to the list of messages, we add them to our MidiBuffer object. Add this function, which calls the MidiBuffer::addEvent() function:
void addMessageToBuffer (const juce::MidiMessage& message)
{
auto timestamp = message.getTimeStamp();
auto sampleNumber = (int) (timestamp * sampleRate);
midiBuffer.addEvent (message, sampleNumber);
}
Now modify the setNoteNumber() function and the Slider::onValueChange helper object to make use of this function. This allows us to schedule MIDI message events into the future:
void setNoteNumber (int noteNumber)
{
auto message = juce::MidiMessage::noteOn (1, noteNumber, (juce::uint8) 100);
message.setTimeStamp (juce::Time::getMillisecondCounterHiRes() * 0.001 - startTime);
addMessageToBuffer (message);
auto messageOff = juce::MidiMessage::noteOff (message.getChannel(), message.getNoteNumber());
messageOff.setTimeStamp (message.getTimeStamp() + 0.1);
addMessageToBuffer (messageOff);
}
volumeSlider.onValueChange = [this]
{
auto message = juce::MidiMessage::controllerEvent (10, 7, (int) volumeSlider.getValue());
message.setTimeStamp (juce::Time::getMillisecondCounterHiRes() * 0.001 - startTime);
addMessageToBuffer (message);
};
Iterating over a MidiBuffer object
To read the messages from the buffer we need to implement our timer. Add the Timer class as a base class:
class MainContentComponent : public juce::Component,
private juce::Timer
{
And implement the Timer::timerCallback() function:
void timerCallback() override
{
auto currentTime = juce::Time::getMillisecondCounterHiRes() * 0.001 - startTime;
auto currentSampleNumber = (int) (currentTime * sampleRate);
for (const auto metadata : midiBuffer)
{
if (metadata.samplePosition > currentSampleNumber)
break;
auto message = metadata.getMessage();
message.setTimeStamp (metadata.samplePosition / sampleRate);
addMessageToList (message);
}
midiBuffer.clear (previousSampleNumber, currentSampleNumber - previousSampleNumber);
previousSampleNumber = currentSampleNumber;
}
- : Calculate the current time in samples.
- : Iterate over the messages in the buffer.
- : If the timestamp for the MIDI message most recently retrieved from the MidiBuffer object is in the future, then we have finished processing and we exit the
while() loop.
- : The timestamps of the MidiMessage objects obtained will have the timestamps based on sample numbers. Let's reset this to our seconds-based timestamp system so that it works with our
addMessageToList() function without having to modify it.
- : The MidiBuffer::clear() function clears MIDI messages from the buffer that have timestamps within a certain range. We use this to remove messages that we have just processed.
- : Keep track of the time that this function executed for use the next time that the
timerCallback() function is called.
Finally, we need to start the timer in our MainContentComponent constructor:
setSize (800, 300);
startTimer (1);
}
- Note
- The code for these modifications can be found in the
MidiMessageTutorial_02.h file of the demo project.
- Exercise
- Add buttons for the crash cymbal (note number 49) and ride cymbal (note number 51). Add a slider for panning control (CC10). Space has been left for you to add these three components in the
resized() function.
Summary
This tutorial has introduced the MidiMessage class and the MidiBuffer class. After reading this tutorial you should be able to:
- Create MidiMessage objects of specific types — note-on, note-off, continuous controller (control change), and so on.
- Parse a MidiMessage object to discover its type and obtain useful data from it.
- Store MIDI messages in a MidiBuffer object.
- Iterate over MIDI messages in a MidiBuffer object based on their timestamps.
See also
