This tutorial illustrates how to handle MIDI input events. In addition to handing MIDI data from an external source, an on-screen keyboard component is introduced.
Intermediate
Windows, macOS, Linux
AudioDeviceManager, MidiMessage, MidiInputCallback, ComboBox, MidiKeyboardComponent, MidiKeyboardState, CallbackMessage, ScopedValueSetter
Getting started
Download the demo project for this tutorial here: PIP | ZIP. Unzip the project and open the first header file in the Projucer.
If you need help with this step, see Tutorial: Projucer Part 1: Getting started with the Projucer.
- Note
- Ideally, you should have an external MIDI source attached to your computer. Failing this, some kind of virtual MIDI source (that create virtual MIDI ports on the computer) would be helpful.
The demo project
The demo project presents an on-screen MIDI keyboard and allows the user to select one of the hardware device MIDI inputs using a combo-box. MIDI events received from either of these sources are displayed in the lower part of the window. This is shown in the following screenshot:
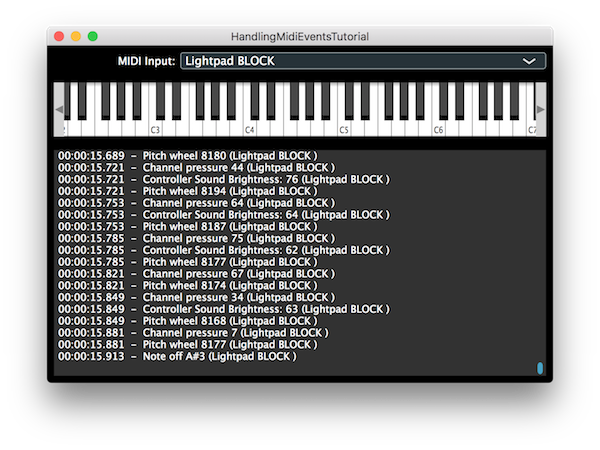
The application window
MIDI input
This tutorial demonstrates how to handle MIDI input in a basic application. JUCE makes it easy to discover the list of connected hardware MIDI interfaces. It also provides the MidiKeyboardComponent class that allows you to display an on-screen keyboard. First, let's look at the member variables in our MainContentComponent class:
juce::AudioDeviceManager deviceManager;
juce::ComboBox midiInputList;
juce::Label midiInputListLabel;
int lastInputIndex = 0;
bool isAddingFromMidiInput = false;
juce::MidiKeyboardState keyboardState;
juce::MidiKeyboardComponent keyboardComponent;
juce::TextEditor midiMessagesBox;
double startTime;
- : We use the AudioDeviceManager class to find which MIDI input devices are enabled.
- : We display the names of the MIDI input devices in this combo-box for the user to select.
- : This is used to de-register a previously selected MIDI input when the user selects a different input.
- : This flag is used to indicate that MIDI data is arriving from an external source, rather than mouse-clicks on the on-screen keyboard.
- : The MidiKeyboardState class keeps track of which MIDI keys are currently held down.
- : This is the on-screen keyboard component.
In the MainContentComponent constructor we initialise , , and . We also take a note of the application start time so we can display the MIDI data timestamps relative to this.
MainContentComponent()
startTime (
juce::
Time::getMillisecondCounterHiRes() * 0.001)
{
We must pass a MidiKeyboardState object to initialise the MidiKeyboardComponent object. And, since these are statically allocated objects the MidiKeyboardState must be listed first in our member variables.
MIDI input list
The combo-box containing the list of MIDI inputs is populated by getting the list of MIDI inputs connected to the computer from the MidiInput class using the MidiInput::getDevices() function:
addAndMakeVisible (midiInputList);
midiInputList.setTextWhenNoChoicesAvailable ("No MIDI Inputs Enabled");
auto midiInputs = juce::MidiInput::getAvailableDevices();
juce::StringArray midiInputNames;
for (auto input : midiInputs)
midiInputNames.add (input.name);
midiInputList.addItemList (midiInputNames, 1);
midiInputList.onChange = [this] { setMidiInput (midiInputList.getSelectedItemIndex()); };
for (auto input : midiInputs)
{
if (deviceManager.isMidiInputDeviceEnabled (input.identifier))
{
setMidiInput (midiInputs.indexOf (input));
break;
}
}
if (midiInputList.getSelectedId() == 0)
setMidiInput (0);
If the user changes the selected MIDI input then the lambda function assigned to the ComboBox::onChange helper object will be called:
midiInputList.onChange = [this] { setMidiInput (midiInputList.getSelectedItemIndex()); };
The setMidiInput() function makes our application start listening to the selected device. It also enables the device if it is currently disabled:
void setMidiInput (int index)
{
auto list = juce::MidiInput::getAvailableDevices();
deviceManager.removeMidiInputDeviceCallback(
list[lastInputIndex].identifier,
this);
auto newInput =
list[index];
if (! deviceManager.isMidiInputDeviceEnabled (newInput.identifier))
deviceManager.setMidiInputDeviceEnabled (newInput.identifier, true);
deviceManager.addMidiInputDeviceCallback (newInput.identifier, this);
midiInputList.setSelectedId (index + 1, juce::dontSendNotification);
lastInputIndex = index;
}
Handling external MIDI input
We implement the MidiInputCallback::handleIncomingMidiMessage() pure virtual function. This updates the keyboard state (which in turn will update the MidiKeyboardComponent object):
void handleIncomingMidiMessage (juce::MidiInput* source, const juce::MidiMessage& message) override
{
const juce::ScopedValueSetter<bool> scopedInputFlag (isAddingFromMidiInput, true);
keyboardState.processNextMidiEvent (message);
postMessageToList (message, source->getName());
}
Notice the scopedInputFlag variable makes use of the ScopedValueSetter class. This does the following:
- It stores the current state of the
isAddingFromMidiInput member.
- It sets the
isAddingFromMidiInput member to true.
- When the function exits it reset the value of
isAddingFromMidiInput member to the state it was in at the start of the function.
The MIDI keyboard state and component
In the MainContentComponent constructor the MidiKeyboardComponent object is added to our MainContentComponent parent component and made visible. We also listen to the MidiKeyboardState object (not the component):
addAndMakeVisible (keyboardComponent);
keyboardState.addListener (this);
The MidiKeyboardStateListener class has two pure virtual functions that we must implement. These are the MidiKeyboardStateListener::handleNoteOn() and MidiKeyboardStateListener::handleNoteOff() functions.
void handleNoteOn (juce::MidiKeyboardState*, int midiChannel, int midiNoteNumber, float velocity) override
{
if (! isAddingFromMidiInput)
{
auto m = juce::MidiMessage::noteOn (midiChannel, midiNoteNumber, velocity);
m.setTimeStamp (juce::Time::getMillisecondCounterHiRes() * 0.001);
postMessageToList (m, "On-Screen Keyboard");
}
}
void handleNoteOff (juce::MidiKeyboardState*, int midiChannel, int midiNoteNumber, float ) override
{
if (! isAddingFromMidiInput)
{
auto m = juce::MidiMessage::noteOff (midiChannel, midiNoteNumber);
m.setTimeStamp (juce::Time::getMillisecondCounterHiRes() * 0.001);
postMessageToList (m, "On-Screen Keyboard");
}
}
Here you can see how the isAddingFromMidiInput member is used. This prevents events that arrived from the hardware input from being posted to our list more than once.
Posting messages to the list
The postMessageToList() function may look a little unusual at first:
void postMessageToList (const juce::MidiMessage& message, const juce::String& source)
{
(new IncomingMessageCallback (this, message, source))->post();
}
The IncomingMessageCallback class is a subclass of the CallbackMessage class. We need to use this since we can't be sure from which thread the postMessageToList() function will be called. It will be called from the message thread if the user clicks on the MidiKeyboardComponent object. But, if the data arrives from an external MIDI source then it will be called from the background MIDI thread (possibly an operating system thread).
The CallbackMessage class provides a means of calling a function on the message thread. The CallbackMessage class is a kind of ReferenceCountedObject class. This is why we don't (apparently) need to store the IncomingMessageCallback object anywhere. In fact, the IncomingMessageCallback::post() function (which is the MessageManager::MessageBase::post() function) adds the object to a queue that is handled by the MessageManager class. The MessageManager class will eventually find this object in the queue and call the IncomingMessageCallback::messageCallback() function on the message thread. Once this function has been called, the IncomingMessageCallback object will be deleted. Thus the lifetime of this object is handled (almost) automatically.
- Note
- This is only really necessary since we need to send the data to the message thread. It is likely that some kind of inter-thread communication is necessary in a MIDI application but the exact implementation depends on the circumstances.
Displaying the messages
The addMessageToList() and getMidiMessageDescription() functions are very similar to these functions from Tutorial: Create MIDI data. The main difference is that we make a note of the source of the MIDI message (which hardware input, or the on-screen keyboard):
void addMessageToList (const juce::MidiMessage& message, const juce::String& source)
{
auto time = message.getTimeStamp() - startTime;
auto hours = ((int) (time / 3600.0)) % 24;
auto minutes = ((int) (time / 60.0)) % 60;
auto seconds = ((int) time) % 60;
auto millis = ((int) (time * 1000.0)) % 1000;
auto timecode = juce::String::formatted ("%02d:%02d:%02d.%03d",
hours,
minutes,
seconds,
millis);
auto description = getMidiMessageDescription (message);
juce::String midiMessageString (timecode + " - " + description + " (" + source + ")");
logMessage (midiMessageString);
}
- Exercise
- Add some sliders to the user interface that transmit and respond to messages such as modulation wheel (CC1) and pitch wheel.
Summary
This tutorial has introduced some classes for handing and displaying MIDI input events. In particular you should be able to:
- List the available MIDI input devices.
- Create a menu of MIDI input devices.
- Listen to MIDI arriving at a hardware input.
- Display MIDI note data using the MidiKeyboardComponent class.
- Post messages from other threads to be be dealt with on the message thread using the CallbackMessage class.
See also
