Loading...
Searching...
No Matches
Tutorial: Build a MIDI synthesiser

This tutorial implements a polyphonic sine wave synthesiser that responds to MIDI input. This makes use of the Synthesiser class and related classes.

Level: Intermediate

Platforms: Windows, macOS, Linux

Classes: Synthesiser, SynthesiserVoice, SynthesiserSound, AudioSource, MidiMessageCollector

Getting started

Note
You should be familiar with handling MIDI input in JUCE and how to generate a sine wave. See Tutorial: Handling MIDI events and Tutorial: Build a sine wave synthesiser.

Download the demo project for this tutorial here: PIP | ZIP. Unzip the project and open the first header file in the Projucer.

If you need help with this step, see Tutorial: Projucer Part 1: Getting started with the Projucer.

The demo project

The demo project presents an on-screen keyboard that can be used to play a simple sine wave synthesiser.

The application window containing a MidiKeyboardComponent

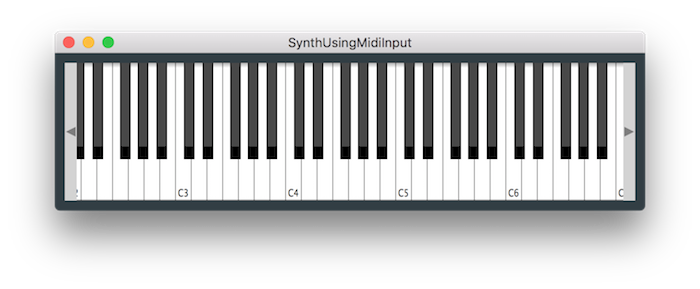
Using keys on the computer keyboard the on-screen keyboard can be controlled (using keys A, S, D, F and so on to control musical notes C, D, E, F and so on). This allows you to play the synthesiser polyphonically.

The Synthesiser class

This tutorial makes use of the JUCE Synthesiser class to implement a polyphonic synthesiser. This shows you all the basic elements needed to customise the synthesiser with your own sounds in your own applications. There are various classes needed to get this to work and in addition to our standard MainContentComponent class, these are:

  • SynthAudioSource: This implements a custom AudioSource class called SynthAudioSource, which contains the Synthesiser class itself. This outputs all of the audio from the synthesiser.
  • SineWaveVoice: This is a custom SynthesiserVoice class called SineWaveVoice. A voice class renders one of the voices of the synthesiser mixing it with the other sounding voices in a Synthesiser object. A single instance of a voice class renders one voice.
  • SineWaveSound: This contains a custom SynthesiserSound class called SineWaveSound. A sound class is effectively a description of the sound that can be created as a voice. For example, this may contain the sample data for a sampler voice or the wavetable data for a wavetable synthesiser.

Setting up the keyboard

Our MainContentComponent class contains the following data members.

juce::MidiKeyboardState keyboardState;
SynthAudioSource synthAudioSource;
juce::MidiKeyboardComponent keyboardComponent;
};

The synthAudioSource and keyboardComponent members are initialised in the MainContentComponent constructor.

MainContentComponent()
: synthAudioSource (keyboardState),
keyboardComponent (keyboardState, juce::MidiKeyboardComponent::horizontalKeyboard)
{
addAndMakeVisible (keyboardComponent);
setAudioChannels (0, 2);
setSize (600, 160);
startTimer (400);
}

See Tutorial: Handling MIDI events for more information on the MidiKeyboardComponent class.

In order that we can start playing the keyboard from the computer's keyboard we grab the keyboard focus just after the application starts. To do this we use a simple timer that fires after 400 ms:

void timerCallback() override
{
keyboardComponent.grabKeyboardFocus();
stopTimer();
}

AudioAppComponent functions

The application uses the AudioAppComponent to set up a simple audio application (see Tutorial: Build a white noise generator for the most basic application). The three required pure virtual functions simply call the corresponding functions in our custom AudioSource class:

void prepareToPlay (int samplesPerBlockExpected, double sampleRate) override
{
synthAudioSource.prepareToPlay (samplesPerBlockExpected, sampleRate);
}
void getNextAudioBlock (const juce::AudioSourceChannelInfo& bufferToFill) override
{
synthAudioSource.getNextAudioBlock (bufferToFill);
}
void releaseResources() override
{
synthAudioSource.releaseResources();
}

The SynthAudioSource class

The SynthAudioSource class does a little more work:

class SynthAudioSource : public juce::AudioSource
{
public:
SynthAudioSource (juce::MidiKeyboardState& keyState)
: keyboardState (keyState)
{
for (auto i = 0; i < 4; ++i) // [1]
synth.addVoice (new SineWaveVoice());
synth.addSound (new SineWaveSound()); // [2]
}
void setUsingSineWaveSound()
{
synth.clearSounds();
}
void prepareToPlay (int /*samplesPerBlockExpected*/, double sampleRate) override
{
synth.setCurrentPlaybackSampleRate (sampleRate); // [3]
}
void releaseResources() override {}
void getNextAudioBlock (const juce::AudioSourceChannelInfo& bufferToFill) override
{
bufferToFill.clearActiveBufferRegion();
juce::MidiBuffer incomingMidi;
keyboardState.processNextMidiBuffer (incomingMidi, bufferToFill.startSample,
bufferToFill.numSamples, true); // [4]
synth.renderNextBlock (*bufferToFill.buffer, incomingMidi,
bufferToFill.startSample, bufferToFill.numSamples); // [5]
}
private:
juce::MidiKeyboardState& keyboardState;
juce::Synthesiser synth;
};
  • [1]: We add some voices to our synthesiser. This number of voices added determines the polyphony of the synthesiser.
  • [2]: We add the sound so that the synthesiser knows which sounds it can play.
  • [3]: The synthesiser needs to know the sample rate of the audio output.
  • [4]: In the getNextAudioBlock() function we pull buffers of MIDI data from the MidiKeyboardState object.
  • [5]: These buffers of MIDI are passed to the synthesiser which will be used to render the voices using the timestamps of the note-on and note-off messages (and other MIDI channel voice messages).
Warning
SynthesiserVoice objects must be added to one and only one Synthesiser object. The Synthesiser object manages the lifetime of the voices.

SynthesiserSound objects can be shared between Synthesiser objects if you wish. The SynthesiserSound class is a type of ReferenceCountedObject class therefore the lifetime of SynthesiserSound objects is handled automatically.

Note
If you need to keep a pointer to a SynthesiserSound object you should store it in a YourSoundClass::Ptr variable for this memory management to work.

The SineWaveSound class

Our sound class is very simple, it doesn't even need to contain any data. It just needs to report whether this sound should play on particular MIDI channels and specific notes or note ranges on that channel. In our simple case, it just returns true for both the appliesToNote() and appliesToChannel() functions. As mentioned above, the sound class might be where you would store data that is needed to create the sound (such as a wavetable).

struct SineWaveSound : public juce::SynthesiserSound
{
SineWaveSound() {}
bool appliesToNote (int) override { return true; }
bool appliesToChannel (int) override { return true; }
};

Sine wave voice state

The SineWaveVoice class is a bit more complex. It needs to maintain the state of one of the voices of the synthesiser. For our sine wave, we need these data members:

private:
double currentAngle = 0.0, angleDelta = 0.0, level = 0.0, tailOff = 0.0;
};

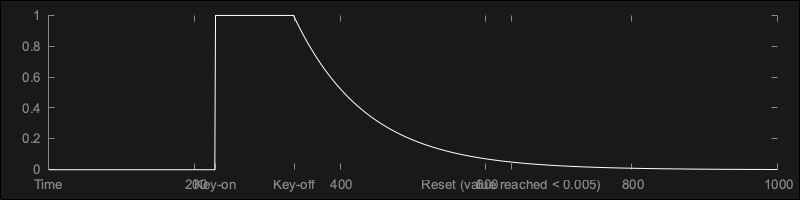
See Tutorial: Build a sine wave synthesiser for information on the first three. The tailOff member is used to give each voice a slightly softer release to its amplitude envelope. This gives each voice a slight fade out at the end rather than stopping abruptly.

Exponential release envelope

Checking which sound can be played

The SynthesiserVoice::canPlaySound() function must be overriden to return whether the voice can play a sound. We could just return true in this case but our example illustrates how to use dynamic_cast to check the type of the sound class being passed in.

bool canPlaySound (juce::SynthesiserSound* sound) override
{
return dynamic_cast<SineWaveSound*> (sound) != nullptr;
}

Starting a voice

A voice is started by the owning synthesiser by calling our SynthesiserVoice::startNote() function, which we must override:

void startNote (int midiNoteNumber, float velocity,
juce::SynthesiserSound*, int /*currentPitchWheelPosition*/) override
{
currentAngle = 0.0;
level = velocity * 0.15;
tailOff = 0.0;
auto cyclesPerSecond = juce::MidiMessage::getMidiNoteInHertz (midiNoteNumber);
auto cyclesPerSample = cyclesPerSecond / getSampleRate();
angleDelta = cyclesPerSample * 2.0 * juce::MathConstants<double>::pi;
}

Again, most of this should be familar to your from Tutorial: Build a sine wave synthesiser. The tailOff value is set to zero at the start of each voice. We also use the velocity of the MIDI note-on event to control the level of the voice.

Rendering a voice

The SynthesiserVoice::renderNextBlock() function must be overriden to generate the audio.

void renderNextBlock (juce::AudioSampleBuffer& outputBuffer, int startSample, int numSamples) override
{
if (angleDelta != 0.0)
{
if (tailOff > 0.0) // [7]
{
while (--numSamples >= 0)
{
auto currentSample = (float) (std::sin (currentAngle) * level * tailOff);
for (auto i = outputBuffer.getNumChannels(); --i >= 0;)
outputBuffer.addSample (i, startSample, currentSample);
currentAngle += angleDelta;
++startSample;
tailOff *= 0.99; // [8]
if (tailOff <= 0.005)
{
clearCurrentNote(); // [9]
angleDelta = 0.0;
break;
}
}
}
else
{
while (--numSamples >= 0) // [6]
{
auto currentSample = (float) (std::sin (currentAngle) * level);
for (auto i = outputBuffer.getNumChannels(); --i >= 0;)
outputBuffer.addSample (i, startSample, currentSample);
currentAngle += angleDelta;
++startSample;
}
}
}
}
  • [6]: This loop is used for the normal state of the voice, while the key is being held down. Notice that we use the AudioSampleBuffer::addSample() function, which mixes the currentSample value with the value alread at index startSample. This is because the synthesiser will be iterating over all of the voices. It is the responsibility of each voice to mix its output with the current contents of the buffer.
  • [7]: When the key has been released the tailOff value will be greater than zero. You can see the synthesis algorithm is similar.
  • [8]: We use a simple exponential decay envelope shape.
  • [9]: When the tailOff value is small we determine that the voice has ended. We must call the SynthesiserVoice::clearCurrentNote() function at this point so that the voice is reset and available to be reused.
Warning
It is very important that you take note of the startSample argument. The synthesiser is very likely to call the renderNextBlock() function mid-way through one of its output blocks. This is because the notes may start on any sample. These start times are based on the timestamps of the MIDI data received.

Stopping a voice

A voice is stopped by the owning synthersiser calling our SynthesiserVoice::stopNote() function, which we must override:

void stopNote (float /*velocity*/, bool allowTailOff) override
{
if (allowTailOff)
{
if (tailOff == 0.0)
tailOff = 1.0;
}
else
{
clearCurrentNote();
angleDelta = 0.0;
}
}

This may include velocity information from the MIDI note-off message, but in many cases we can ignore this. We may be being asked to stop the voice immediately in which case we call the the SynthesiserVoice::clearCurrentNote() function straight away. Under normal circumstances the synthesiser will allow our voices to end naturally. In our case we have the simple tail-off envelope. We trigger our tail-off by setting our tailOff member to 1.0.

Exercise
Try adding a slower attack to the voices such that they don't start abruptly.

Adding external MIDI input

Let's add functionality to allow an external MIDI source to control our synthesiser in addition to the on-screen keyboard.

Warning
You probably need to try this on one of the desktop platforms such as macOS, Windows, or Linux rather than one of the mobile platforms.

Providing a MIDI input to the SynthAudioSource

First add a MidiMessageCollector object as a member of the SynthAudioSource class. This provides somewhere that MIDI messages can be sent and that the SynthAudioSource class can use them:

juce::MidiMessageCollector midiCollector;
};

In order to process the timestamps of the MIDI data the MidiMessageCollector class needs to know the audio sample rate. Set this in the SynthAudioSource::prepareToPlay() function [10]:

void prepareToPlay (int /*samplesPerBlockExpected*/, double sampleRate) override
{
synth.setCurrentPlaybackSampleRate (sampleRate);
midiCollector.reset (sampleRate); // [10]
}

Then you can pull any MIDI messages for each block of audio using the MidiMessageCollector::removeNextBlockOfMessages() function [11]:

void getNextAudioBlock (const juce::AudioSourceChannelInfo& bufferToFill) override
{
bufferToFill.clearActiveBufferRegion();
juce::MidiBuffer incomingMidi;
midiCollector.removeNextBlockOfMessages (incomingMidi, bufferToFill.numSamples); // [11]
keyboardState.processNextMidiBuffer (incomingMidi, bufferToFill.startSample,
bufferToFill.numSamples, true);
synth.renderNextBlock (*bufferToFill.buffer, incomingMidi,
bufferToFill.startSample, bufferToFill.numSamples);
}

We'll need access to this MidiMessageCollector object from outside the SynthAudioSource class, so add an accessor to the SynthAudioSource class like this:

juce::MidiMessageCollector* getMidiCollector()
{
return &midiCollector;
}

In our MainContentComponent class we'll add this MidiMessageCollector object as a MidiInputCallback object to our application's AudioDeviceManager object.

Listing MIDI inputs

To present a list of MIDI input devices to user, we'll use some code from Tutorial: Handling MIDI events. Add some members to our MainContentComponent class:

juce::ComboBox midiInputList;
juce::Label midiInputListLabel;
int lastInputIndex = 0;

Then add the following code to the MainContentComponent constructor.

addAndMakeVisible (midiInputListLabel);
midiInputListLabel.setText ("MIDI Input:", juce::dontSendNotification);
midiInputListLabel.attachToComponent (&midiInputList, true);
auto midiInputs = juce::MidiInput::getAvailableDevices();
addAndMakeVisible (midiInputList);
midiInputList.setTextWhenNoChoicesAvailable ("No MIDI Inputs Enabled");
juce::StringArray midiInputNames;
for (auto input : midiInputs)
midiInputNames.add (input.name);
midiInputList.addItemList (midiInputNames, 1);
midiInputList.onChange = [this] { setMidiInput (midiInputList.getSelectedItemIndex()); };
for (auto input : midiInputs)
{
if (deviceManager.isMidiInputDeviceEnabled (input.identifier))
{
setMidiInput (midiInputs.indexOf (input));
break;
}
}
if (midiInputList.getSelectedId() == 0)
setMidiInput (0);

Add the setMidiInput() function that is called in the code above:

void setMidiInput (int index)
{
auto list = juce::MidiInput::getAvailableDevices();
deviceManager.removeMidiInputDeviceCallback (list[lastInputIndex].identifier,
synthAudioSource.getMidiCollector()); // [12]
auto newInput = list[index];
if (! deviceManager.isMidiInputDeviceEnabled (newInput.identifier))
deviceManager.setMidiInputDeviceEnabled (newInput.identifier, true);
deviceManager.addMidiInputDeviceCallback (newInput.identifier, synthAudioSource.getMidiCollector()); // [13]
midiInputList.setSelectedId (index + 1, juce::dontSendNotification);
lastInputIndex = index;
}

Notice that we add the MidiMessageCollector object from our SynthAudioSource object as a MidiInputCallback object [13] for the specified MIDI input device. We also need to remove the previous MidiInputCallback object for the previously selected MIDI input device if the user changes the selected device using the combo-box [12].

We need to position this ComboBox object and adjust the position of the MidiKeyboardComponent object in our resized() function:

void resized() override
{
midiInputList .setBounds (200, 10, getWidth() - 210, 20);
keyboardComponent.setBounds (10, 40, getWidth() - 20, getHeight() - 50);
}

Run the application again and it should look something like this:

The application window showing the MIDI input device list

Of course, the devices listed will depend on your specific system configuration.

Note
The source code for this modified version of the application can be found in the SynthUsingMidiInputTutorial_02.h file of the demo project.
Exercise
Try adding a slider to control the length of the tail-off for each voice. You could also add a slider to control the length of the attack, if you added this in the earlier exercise.

Summary

This tutorial has introduced the Synthesiser class. After reading this tutorial you should be able to:

See also

linkedin facebook pinterest youtube rss twitter instagram facebook-blank rss-blank linkedin-blank pinterest youtube twitter instagram