
Loading...
Searching...
No Matches
This tutorial shows how to process audio to change its output level. This is achieved by processing the low-level audio sample data.
Level: Intermediate
Platforms: Windows, macOS, Linux
Classes: AudioAppComponent, Random, AudioSourceChannelInfo, AudioBuffer, Slider
Download the demo project for this tutorial here: PIP | ZIP. Unzip the project and open the first header file in the Projucer.
If you need help with this step, see Tutorial: Projucer Part 1: Getting started with the Projucer.
The demo project presents a window containing a single slider that can be used to control the output level of a white noise generator. This is shown in the following screenshot.
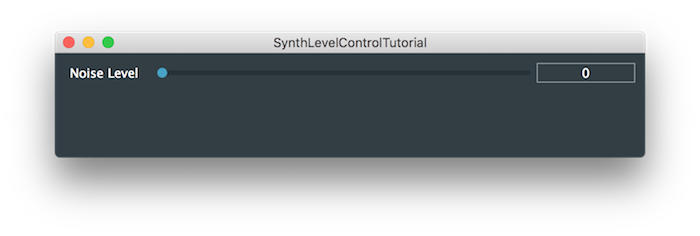
Run the project from within your IDE to confirm that you can indeed control the level of the white noise generated.
Examining the code, you may notice that our MainContentComponent class does not inherit the from Slider::Listener class. In fact, we grab the value of the slider as soon as our getNextAudioBlock() function is called:
This technique is acceptable in a simple application such this, but in more complex applications you almost certainly want to use a different technique. It is better practice to store the values that controls your audio processing system in the "data model" of your application rather than relying solely on your UI controls to store these values.
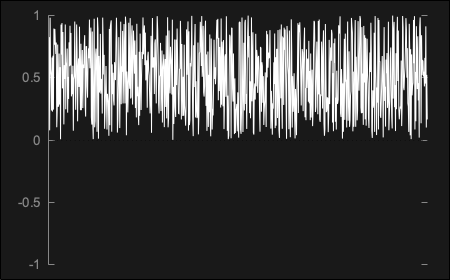
getNextAudioBlock() function you must not call the Slider::setValue() function within this the getNextAudioBlock() function. This is because this code is running on the audio thread. You must not do anything that changes the state of a UI object from the audio thread, although it is acceptable to query the state of UI objects, as long as you're sure these don't have side effects.In order to generate the white noise at the level dictated by the slider, we need to perform some basic arithmetic. The Random::nextFloat() function always generates values between 0.0 and 1.0. If we plot this as an audio waveform, then it would look something like this:
A simple way to approach this is to first scale the noise, such that it is always scaled between -1.0 and 1.0. To do this, we can multiply by 2.0 and subtract 1.0. This would result in a signal as shown below:
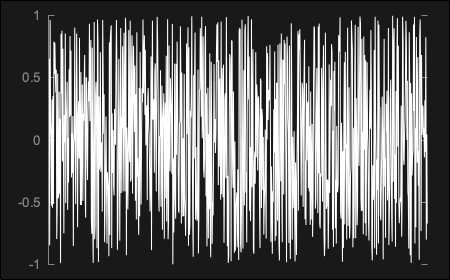
This is implemented in code within our getNextAudioBlock() function as follows:
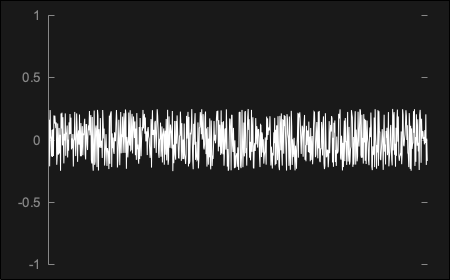
Reducing the number of arithmetic operations is often a goal for DSP. This is one case where we can avoid performing one multiplication operation per sample. To achieve this, first we could multiply the values between 0.0 and 1.0 by a value equal to double the required output level. Let's say we want the level to be 0.25. If we multiply our random values by 0.5 we would get something like this:
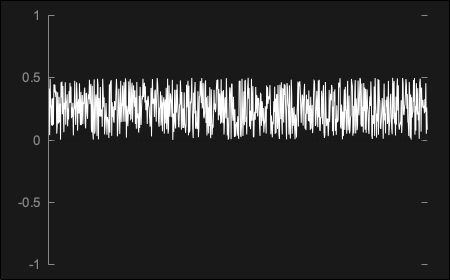
Finally, we need to offset the random values such that they are centred around zero. To do this, we subtract a value equal to half of the value we multiplied by. This is, of course, is the original level value. The final result will be something like this:
This could be implemented in code via our getNextAudioBlock() function where you should see that there is now one fewer multiplication operation per sample:
SynthLevelControlTutorial_02.h file of the demo project.One remaining problem with this implementation is that the level is only updated to a new constant value for each of the audio blocks generated. In this case, it isn't audible (as the source sound in white noise). If this was applied to most audio content, then this technique would introduce audio artifacts. This is because the level value may be jumping quite abruptly between each audio block, rather than changing smoothly during the audio blocks. Techniques for avoiding these artifacts (such as audible crackling when the level changes) are explored in other tutorials (see Tutorial: Build a sine wave synthesiser).
Add a second slider to the user interface. Use the first slider to control the level of the left channel and this second slider to control the level of the right channel.
This tutorial has illustrated how to control the level of an audio signal. We have covered the following topics: