
Loading...
Searching...
No Matches
This tutorial introduces simple sine wave synthesis. We show how to manage the state of a sine wave oscillator and write data to the audio output.
Level: Intermediate
Platforms: Windows, macOS, Linux
Classes: AudioAppComponent, Slider, MathConstants
Download the demo project for this tutorial here: PIP | ZIP. Unzip the project and open the first header file in the Projucer.
If you need help with this step, see Tutorial: Projucer Part 1: Getting started with the Projucer.
The demo project is based on the Audio Application template from the Projucer. It presents a single slider to the user to control the frequency of a sine wave.
This tutorial synthesises a sine wave using the standard library function std::sin(). In order to use this we need to maintain a state for our sine wave generation by storing the current phase angle and the amount by which the phase angle needs to increment for each output sample. This size of this change per sample ("delta") is dependent on the sample rate of the output and the frequency of the sine wave we want to generate.
std::sin() function as it probably isn't the most efficient technique. Commonly a wavetable would be used, see Tutorial: Wavetable synthesis. Wavetables also allow for waveshapes other than sine waves, too.In our MainContentComponent class we store three double members [1]:
We have a simple function that updates the angleDelta member:
Before this function can work correctly we need to know the output sample rate. This is because we need to know how frequently the samples are being generated, this is in order to know the amount of change that is needed per sample. We are passed the sample rate by the AudioAppComponent::prepareToPlay() callback function:
Here we store a copy of the sample rate value and call our updateAngleDelta() function initially.
When the slider is moved while the app is running, we need to update the angleDelta member again:
Here we check that the sample rate is valid, before calling the updateAngleDelta() function again.
During the getNextAudioBlock() callback we need to generate the actual sine wave and write it to the output:
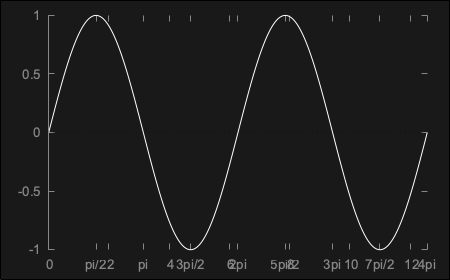
For each output sample we calculate the sine function for the current angle, then increment the angle for the next sample. Notice that we bring the level down to 0.125 as a full scale sine wave will be very loud! We could (and perhaps should) wrap the current angle value back to zero when it reaches 2pi. Since larger values still return a valid value we can actually avoid this calculation. We get something like that shown in the following image:
You may have noticed that the slider value changes non-linearly (if not you should try this out now). These changes are, in fact, logarithmic. This gives us higher resolution for smaller values and lower resolution for larger values. When controlling a frequency value this is often appropriate (as musically, we hear equal changes in ratios between frequences rather than equal linear changes). This is configured by using the Slider::setSkewFactorFromMidPoint() function [4]. Our slider range is set to 50..5000 therefore setting the centre of the slider track to represent 500 would mean there is an equal musical interval between the slider minimum and the centre, and the centre and the slider maximum:
The skew factor for the slider can be set directly using the Slider::setSkewFactor() function although it is often easier to think about what value you want at the mid-point.
You may notice — especially in the higher frequencies — that there are some audible, and probably unwanted, artifacts produced as the slider is moved. This is because the slider is actually changing in discrete steps, and when the slider is moved quickly then these steps are quite large. In addition to this the slider frequency is only updated for each audio block, therefore the precise effect of these changes will be dependent on the hardware block size.
Let's add two members to our class, one to store the current frequency being used for synthesis, and another target frequency that the user has requested by moving the slider. Then we can more slowly ramp between these values to remove the artifacts:
We initialise these values at the same time [5]. We can also initialise the slider to the same value [6]:
The key to the way this algorithm works is to check whether the current and target values are the same or different. If they are the same, then we can simply use our original code as the angleDelta member doesn't need to change. If the current and target values are different, then we need to update the angleDelta member for each sample as we gradually move the current value closer to the target.
deltaAngle member based on this new frequency.for() loop, if possible. Instead, having the condition tested outside the loop, and we use two different, but quite similar loops depending upon whether the parameter is changing.Finally, we need to update our Slider::onValueChange helper object so that it just updates the target value:
And that's it! Try this now and the artifacts from the slider movement should have been removed.
float rather than double variables then there would be some innaccuracy to the calculations when the current angle value became very large. By not wrapping the phase at 2pi using the std::sin() function performs reasonably well compared to a simple wavetable technnique. See Tutorial: Wavetable synthesis for an exploration of this.In this tutorial we have introduced some basic methods of synthesising and controlling a sine wave. We have looked at: