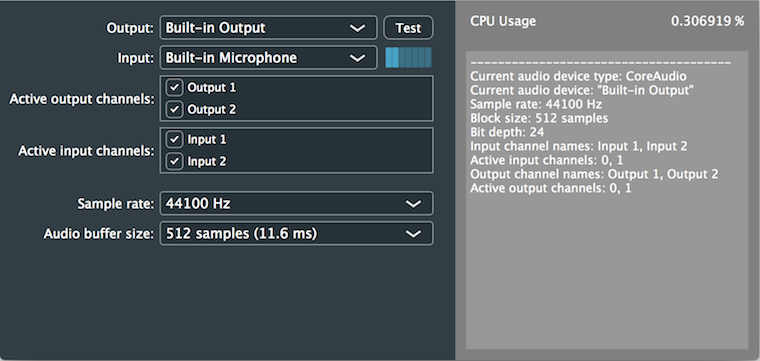
This tutorial introduces the AudioDeviceManager class which is used for managing audio devices on all platforms. This allows you to configure things such as the device sample rate and the number of inputs and outputs.
Level: Intermediate
Platforms: Windows, macOS, Linux, iOS, Android
Classes: AudioDeviceManager, AudioDeviceSelectorComponent, ChangeListener, BigInteger
Download the demo project for this tutorial here: PIP | ZIP. Unzip the project and open the first header file in the Projucer.
If you need help with this step, see Tutorial: Projucer Part 1: Getting started with the Projucer.
The demo project is based on the Audio Application template from the Projucer. It presents an AudioDeviceSelectorComponent object which allows you to configure your audio device settings. The demo project also presents a simple text console that reports the current audio device settings. The application also shows the current CPU usage of the audio processing element of the application.

JUCE provides a consistent means of accessing audio devices on all of the platforms it supports. While the demo application provided here may be deployed only to desktop platforms, this is only due to GUI layout constraints. Audio works seamlessly on mobile platforms, too.
In the Audio Application template, the AudioAppComponent class instantiates an AudioDeviceManager object deviceManager — it is a public member, therefore it is accessible from your subclass. The AudioAppComponent class also performs some basic initialisation of this AudioDeviceManager object — this happens when you call AudioAppComponent::setAudioChannels().
The AudioDeviceManager class will attempt to use the default audio device unless this is overridden. This may be configured in code or via the AudioDeviceSelectorComponent as illustrated here. Device settings and preferences may be stored and recalled on subsequent applications launches. The AudioDeviceManager class can also fallback to the default device in such circumstances if the preferred device is no longer available (for example, if an external audio device has been unplugged since the last launch).
The AudioDeviceManager class is also a hub for incoming MIDI messages. This is explored in other tutorials (see Tutorial: Handling MIDI events).
The AudioDeviceManager class can broadcast changes to its settings as it inherits from the ChangeBroadcaster class. The right-hand side of our component posts some of the important audio device settings whenever a change in our AudioDeviceManager object is triggered.
The AudioDeviceSelectorComponent class provides convenient way of configuring audio devices on all platforms. As mentioned above, this is displayed in the right-hand side of our user interface for the demo project. When the AudioDeviceSelectorComponent object is constructed we pass it the AudioDeviceManager object that we want it to control along with a number of other options including the number of channels to support (see the AudioDeviceSelectorComponent class constructor for more information). Here we create the AudioDeviceSelectorComponent object by passing it the AudioDeviceManager object that is the member of the AudioAppComponent, allowing up to 256 input and output channels, hiding MIDI configuration, and showing our channels as single channels rather than stereo pairs:
Our interface is configured to allow control over:
You should notice that when we change any of these settings we get a new list of data posted into our little console window on the right-hand side of the interface. This is because the AudioDeviceManager class is a type of ChangeBroadcaster class.
In our changeListenerCallback() function we call our dumpDeviceInfo() function that accesses the AudioDeviceManager object to retrieve the current audio device. We then obtain various pieces of information about the device:
getListOfActiveBits() function to convert the BigInteger object that represents the list of active channels as a bitmask into a String object. The BigInteger object is used as a bitmask, similar to std::bitset or std::vector<bool>. Here the channels are represented by a 0 (inactive) or 1 (active) in the bits comprising the BigInteger value. See Tutorial: The BigInteger class for other operations that can be performed on BigInteger objects.Responding to such changes is really useful in a real application as we will often need to know when the number of channels available to our application changes. Often, it is important to respond appropriately to changes in sample rate and the other audio parameters.
The AudioDeviceSelectorComponent class also contains a Test button. This plays a sine tone out of the device outputs, which is useful for users to test that audio output is working on their target device.
We obtain the CPU usage for the audio processing element of our application by calling the AudioDeviceManager::getCpuUsage() function. In our MainContentComponent class we inherit from the Timer class, start the timer to trigger every 50ms. In our timerCallback() function we obtain the CPU usage from the AudioDeviceManager object. This value is displayed in a Label object as a percentage (to six decimal places):
Since we are doing very little audio processing in this particular application, the CPU usage is likely to be very low — probably less than 1% on many target devices. You can, however, see the effect that different sample rates and buffer size have on the CPU load by trying a combination of settings. In general, higher sample rates and smaller buffer sizes will use more CPU.
This tutorial has introduced some of the features of the AudioDeviceManager class and audio devices in general. You should now know how to: