This tutorial follows on from Tutorial: Create a basic Audio/MIDI plugin, Part 1: Setting up, and will talk through starting from a clean project and ending up with a fully functioning, if somewhat simple, plug-in that can react to incoming MIDI notes.
Level: Intermediate
Platforms: Windows, macOS, Linux
Plugin Format: VST, VST3, AU, Standalone
Classes: AudioProcessorEditor, AudioProcessor, Slider, MidiMessage, MidiBuffer
Launch the Projucer and create a new audio plug-in project with the name TutorialPlugin. If you don't remember how to do that, please refer to Tutorial: Projucer Part 1: Getting started with the Projucer.
A newly-created audio plug-in project contains two main classes: PluginProcessor handles the audio and MIDI IO and processing logic, and PluginEditor handles any on screen GUI controls or visualisations.
When passing information between these two it is best to consider the processor as the parent of the editor. There is only one plug-in processor whereas you can create multiple editors. Each editor has a reference to the processor such that it can edit or access information and parameters from the audio thread. It is the editor’s job to set and get information on this processor thread and not the other way around.
The main function we will be editing in the PluginProcessor.cpp file is the processBlock() method. This receives and produces both audio and MIDI data to the plug-in output. The main function we will change in the PluginEditor.cpp file is the constructor, where we initialise and set up our window and GUI objects, and also the paint() method where we can draw extra controls and custom GUI components.
The editor constructor currently has one method call — setSize (400, 300) — which sets the size of our plug-in window. Let's make a smaller window of (200, 200) for this simple application.
We will create a slider object to change the volume of MIDI messages as they come in.
Create a new Slider object in the Editor header file called midiVolume [1]:
We can set the properties of this slider with various functions in the editor constructor. We must also call addAndMakeVisible (&midiVolume) to attach our slider to the editor. There are many different slider styles and parameters to use and experiment with in your own project. For this tutorial adjust the slider parameters such that your editor constructor looks like this:
JUCE windows have a method called resized() that is called once at the initialisation of the window and every time the window is resized by the user (if resizing is enabled). This is a good place to set the size and position of our sliders (and other GUI components) so they can be positioned relative to the window bounds.
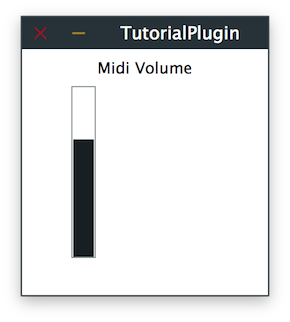
Lets also change the "Hello World" text to "Midi Volume" in the paint() function and move it to the top. This function is where all custom shapes and GUI elements are drawn to the window.
paint() and resized() in Tutorial: The Graphics class and Tutorial: Parent and child components.Running this program should create a plug-in that looks like this in the host editor:

We now have an control that we can adjust, but that doesn’t actually control anything. We need to intercept the incoming MIDI data and replace the note on volume with the volume of our slider, and this is done in the processor. In order to get the slider value to control the MIDI effect on the processor thread we need to create a new variable on the processor thread that we can use the slider to change.
Create a new public float variable called noteOnVel in the processor class header. This is the variable that we will set with the slider.
We need to set this value whenever the slider is changed. To do this we use a slider listener callback function. Any class can inherit slider listener functionality but for the purposes of this tutorial we will add this functionality to the editor class.
Add the inheritance [2] and the default callback function [3] so the editor class looks like this:
Now we add the slider listener to our volume slider in the editor constructor:
...and insert the listener function that sets our public processor volume variable:
We now have a slider that controls our variable in the processor class. We now need to use this processor variable to alter our MIDI data.
The processBlock() method in the processor class receives and produces both MIDI and audio buffers in real time. We are going to iterate through the midi buffer to intercept signals of noteOn type and set their velocity to the value of our slider.
The MIDI messages are all passed through this function. To alter the MIDI as it passes through we create a new MidiBuffer object called processedMidi and append our modified MIDI signals to this new buffer before swapping it with the original at the end (this avoids direct modification problems). Remove the current code in the processBlock() method (this handles the audio buffer, which we do not need for this tutorial) and replace it with the code below.
Run the plug-in in the host environment and you will see that all MIDI note on signals are coming through our plug-in have the value set with our slider. The if() statement above can be also used to modify and apply various transformations and effects to other types of incoming MIDI signals. With these methods you can build more complex effects and GUIs.
AudioPluginDemo, which is located in JUCE/examples/Plugins.After reading this tutorial, you should be able to: