This tutorial shows how to add graphical content to the application window by creating a main content component. This is important for displaying content to the user within a window.
Level: Beginner
Platforms: Windows, macOS, Linux
Classes: DocumentWindow, Component, Graphics
Launch the Projucer and create a new GUI application project with the name MainComponentTutorial. In the Files to Auto-Generate: field make sure you select Create a Main.cpp file only.
If you need help with this step, see Tutorial: Projucer Part 1: Getting started with the Projucer.
Modify the MainComponentTutorialApplication class to include the following MainWindow class as follows:
Add the following line to the initialise() function:
Finally, add the following line to the shutdown() function:
In the last tutorial (Tutorial: The application window), we covered the main window, which serves as the frame in which the application's graphical interface lives. In this tutorial, we will create a main content component, which is the object that shows the content of the app's interface. The main content component is an essential object for every JUCE app.
If you create a new GUI application with The Projucer, it will automatically generate a main content component for you. However, a good way to familiarise yourself with the concept and to understand how JUCE apps are structured is to create such a main content component yourself. This is what we will do in this tutorial.
Open the tutorial project in your IDE. We take off at the same point we arrived in the last tutorial: with an empty application window. In the Main.cpp file, we have a MainWindow class. We already learned how to use it in the last tutorial (Tutorial: The application window). Now, we will fill this window with content!
However, before we can do that, let's first explore the concept of a component a little bit further.
The most important base class for all JUCE graphical interfaces is the Component class. In JUCE, practically all visible elements of the GUI, be it buttons, sliders, or text fields, are components, deriving from this class. The way to write such an app in JUCE is to create a main component, which is owned by the main application window and is the window's content. All other components will then be children of this main component (see Tutorial: Parent and child components). The DocumentWindow class, from which our MainWindow derives, contains the necessary functionality to make sure the main window shows its content correctly (including the main component and its children).
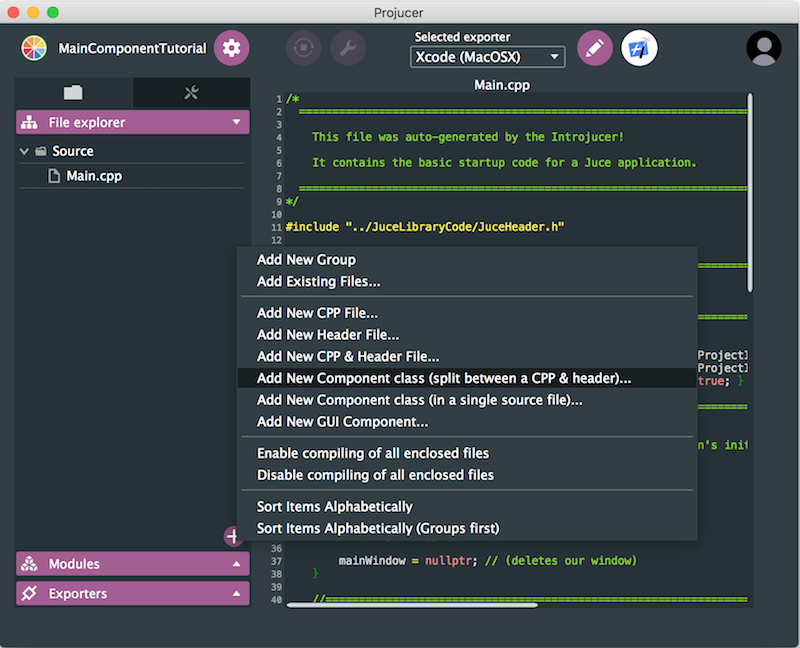
Now, let's create our main component class. For this, we need to create new files where the source code for this class will go. Go back to The Projucer and open the tutorial project there. At the left, make sure that the Files browser is open. Then, right-click on the Source group (that's the file group where new C++ source files should always go) and select Add new Component class (split between CPP & header)... The Projucer will ask you how to name the new Component subclass. In the dialog, enter MainComponent and click on Create Files. You will see that The Projucer has created two new files: MainComponent.cpp and MainComponent.h. Now, save the project and open it again in your IDE. You should now see the new files there as well. The Projucer has automatically created some code for the new component class, which we will examine in the next section.

As you can see, The Projucer automatically derived the new class from the Component class and added the following class declaration:
The Component base class has two important virtual member functions that should be overridden in any class deriving from it. The Projucer already created these two overrides for you:
override to all functions in a class that should override a function from a base class. This prevents unexpected errors in your app, and is part of the JUCE coding standards.The paint() function determines how the Component object is rendered on the screen. This is where we add a custom appearance to our MainComponent class.
The Projucer has automatically added some demo code. Let's put some code of our own into the paint() function.
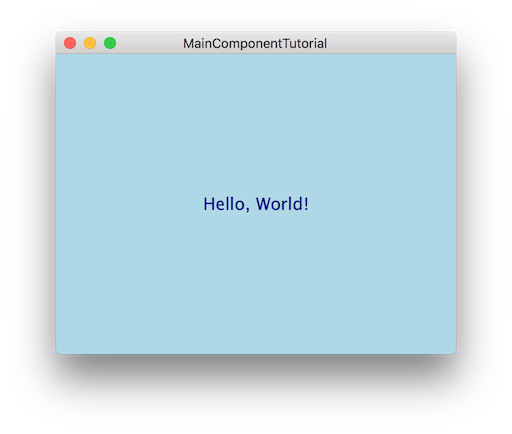
We don't have to go into the details of this code too much. We will learn more about the functions used here (and more) in the next tutorial: Tutorial: The Graphics class. For now, you can probably guess that this demo code fills the component with a light blue background, and then renders the text Hello, World! in a blue font in the centre of the component. The point here is that all the code that determines how the MainComponent object should look goes right here inside the paint() function.
Now, compile and run the code. You will find that instead of the blue background and text, you still only see an empty application window. Why is that?
Well, we did not tell the MainWindow object that it should now show some content. First of all we need to include the header so that the MainWindow class knows about the MainComponent class. Add the folowing include at the top of the Main.cpp file, underneath the already existing include:
The next step is to create a MainComponent object and to add it as the content of the main window. We can do that by calling the DocumentWindow::setContentOwned() function.
MainWindow object is now responsible for the lifetime of MainComponent object and will destroy it automatically when its own destructor is called.Add the following line to the constructor of the MainWindow class:
such that the MainWindow constructor looks like this:
Note that we changed one other detail: the arguments to the Component::centreWithSize() function have changed as well. We now don't explicitly set the size of the MainWindow object anymore, but tell it to figure out its size based on its content:
However, for this to work, the MainComponent object needs to have its size set before the centreWithSize() function call happens. If this isn't done then the main window won't know what window size is appropriate (this will trigger an assertion failure if you run it). The next section explains how to accomplish this.
In principle, there are two ways to set the size of a Component object. Either you set the size in the constructor of the component itself, or you set the size in the constructor of its parent component. For the main component, we usually set the size in the component itself. Add the following line to the constructor of our MainComponent class:
(Of course, you can choose another size if you want.)
This is the reason why the calls to functions Component::getWidth() and Component::getHeight() in the MainWindow class can figure out the size of the window so that the main component is displayed with the correct size. The MainComponent object's size gets set in its own constructor, before the MainWindow object is positioned and sized.
Now all necessary pieces are in place. If you compile and run the app now, you should see the main component drawn correctly into the application window:

setContentOwned() function means (which we set to true here) and how it behaves if you change it. Hint: check out the documentation for the ResizableWindow::setContentOwned() function. Now that we have covered the paint() function, let's move on and see how we can make the MainComponent class react to being resized.
First of all, we need to tell the main window that it should be resizable. Please refer to Tutorial: The application window if you don't remember how to do that.
Now, compile and run the app, and resize the window using the mouse. You will see that the MainComponent object resizes itself to fit the size of the main window — all the necessary code to do that is already implemented for you in the Component base class.
But what if you want some custom work to be done every time the component gets resized? Maybe it has child components which need to be laid out differently depending on the main component's size. In our simple demo app, let's change the text inside the main component such that it shows the current size of the component.
Anything that needs to be done or updated when we need to resize our component goes into our component's resized() function. Currently, the function is empty. Let's add our functionality here.
The text that is displayed inside the component is currently given as a literal string — "Hello, World!" — inside the paint() function. Let's change that by introducing a new member variable to the MainComponent class. It is good practice to always give your variables descriptive, intention-revealing names. This makes the code easier to read and understand, and reduces the amount of additional code comments. We want our new variable to represent the current size of the main component as a string, so let's call it currentSizeAsString.
Member variables are always declared in the private section of a class:
Now let's implement the desired behaviour for the currentSizeAsString object. There are two things to do:
currentSizeAsString object should be rendered on screen.currentSizeAsString object should update itself whenever the main component's size changes.How we achieve the first part should be fairly simple: inside the paint() function, when the g.drawText() function is called, simply replace the literal string there with the currentSizeAsString object:
The second part is more interesting. We already know that every time we resize that the resized() function is called. So let's update the value of the currentSizeAsString object there:
Component::getWidth() and Component::getHeight() are convenient functions that let you query the current size of the component. We also need to convert these integers to String objects. (You can find out more about how to work with the String class in a future tutorial.)
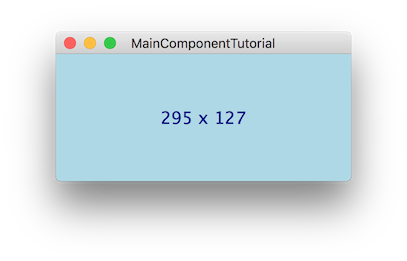
If you compile and run the app now, you will see that it always displays its current size:

We can make two interesting observations here. First, the display is automatically updated — the paint() function is called automatically after the resized() function is called. Second, the size is already shown correctly when the app starts up, even before you first resize the window yourself. Remember that the resized() function is always called whenever anything changes the component's size. This includes the first time the component's size is set and the component is painted after the app launched.
MainComponent::resize() function in such a way that on every resize, the MainComponent object also changes its background colour. You can download a finished version of the tutorial project here: PIP | ZIP and compare it to your own.
This tutorial explained the concept of a main component, how to add one to your app, and how to implement the paint() and resized() functions. After reading this tutorial, you should be familiar with the following important things:
paint() and resized().paint() function, you should add the code that will render the component on the screen.resized() function if you need special behaviour for your component, in order for it to react to size changes.paint() and resized() functions are callback functions that are called automatically when needed.