
Loading...
Searching...
No Matches
Learn how to configure and restrict the bus layouts in your plugins for a multitude of configurations. Check the bus arrangements of your AU plugins using the auval tool provided in Apple's Logic Pro.
Level: Beginner
Platforms: Windows, macOS, Linux
Plugin Format: VST, VST3, AU, Standalone
Classes: AudioProcessor::BusesLayout, AudioProcessor::BusesProperties, AudioChannelSet, AudioProcessor
To follow this tutorial, please make sure that you have a plugin project opened or alternatively create a new Audio Plugin project within the Projucer.
If you need help with this step, see Tutorial: Create a basic Audio/MIDI plugin, Part 1: Setting up.
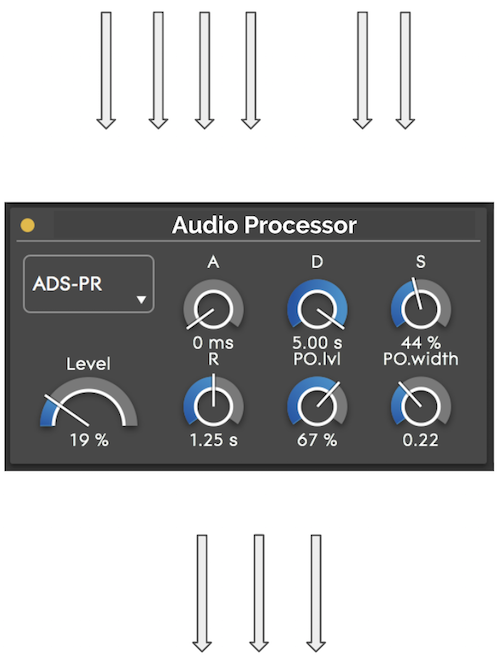
The AudioProcessor class in JUCE takes a number of input channels, processes the incoming data and then supplies the result to a number of output channels as represented in the following figure:
For many types of audio processors, this is sufficient. However, you often want to represent these individual channels as a group in order to facilitate the communication between the host and the processor. For example, the first four input channels could be used as main channels and the last two input channels could be used as a sidechain, as shown below:
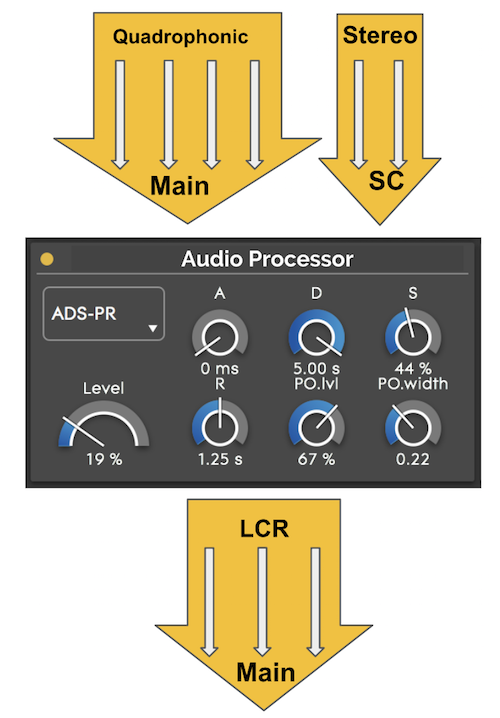
A yellow arrow in the figure above is called a Bus. A bus is therefore a group of channels which typically share the same signal path inside your plugin, for example the main audio signal path or the sidechain signal path. In JUCE each bus has a name so that you can identify its specific purpose in the plugin.
However, grouping your audio processor's input and output channels and naming these groups is not sufficient. You also need to convey information about spatial positioning for each channel inside each bus. For example, you could configure your bus as a stereo bus (Left, Right), a quadraphonic bus (Left, Right, Left Surround, Right Surround) or a mono bus (Centre) etc. In JUCE, each bus is assigned an AudioChannelSet that describes spatial positions for these sets of channels (for example: AudioChannelSet::mono(), AudioChannelSet::stereo(), AudioChannelSet::quadraphonic()).
It's important to note that the AudioChannelSet of each bus is not fixed throughout the lifetime of a plugin. A DAW may request a different AudioChannelSet for a particular bus at any time, for example when the DAW user switches the sidechain source from mono to stereo. To implement this, JUCE supports a callback to interrogate the plugin on which AudioChannelSet objects each bus supports.
In summary, to communicate information about each channel of a plugin at any given time, the DAW and plugin must:
Let's start by exploring how to convey this information to the host as a plugin developer.
We will first focus on the first two points (grouping and naming of channels into buses and selecting an AudioChannelSet for each bus) when writing a plugin. This information is communicated to the DAW by passing an AudioProcessor::BusesProperties instance to the constructor of the AudioProcessor as follows:
The code above informs the DAW that this plugin has two buses: one input bus named "Input" and one output bus named "Output". The second parameter in the withInput() and withOutput() functions describes the initial AudioChannelSet of the respective bus. It's important to remember that the DAW can change this at any time. The third parameter indicates whether the bus is initially enabled or disabled. Since these two buses are main buses, it would not make much sense to disable them.
The previous example would typically be used in an effects plugin. However, a synth plugin would typically only have an output bus and therefore the constructor would look like this:
Another plugin type supported in JUCE is the midi effects plugin. As these only process midi, they don't have any audio bus at all:
The only step required now is to configure the AudioChannelSet objects that a particular bus supports as the DAW may wish to change the initial AudioChannelSet provided in the constructor at any time. It's important to note that there is no way for a plugin to actively change its own layout: the plugin is passive and will always be "at the mercy" of the host. It can only reject or accept requested AudioChannelSet configurations.
To do this, the plugin needs to override the AudioProcessor::isBusesLayoutSupported() callback. This callback takes a single BusesLayout parameter which is simply an array of AudioChannelSet objects for each bus of the plugin.
In your AudioProcessor::isBusesLayoutSupported() callback, you need to return whether the given BusesLayout is supported or not. For example, the default callback is to accept any BusesLayout that the DAW requests as shown here:
Most effects plugins will only have a single main input and output bus. Typically, they require the AudioChannelSet to be the same on the input and output side like so:
Remember that there is a special AudioChannelSet called AudioChannelSet::disabled() which indicates that a specific bus is disabled. Most effects plugins will not want their main buses to be disabled, so we can include a check for that in our callback as follows:
Let's say that the plugin can only deal with mono-to-mono or stereo-to-stereo configurations. The last line of the above code already checks that the input and output layout must be the same, therefore we only need to do the preceding checks on either the input or output bus like this:
The bus layout configurations that we support in our plugins can be tested using different tools as it can be very easy to overlook edge cases in the layouts defined in the isBusesLayoutSupported() function.
In this tutorial we present two solutions, the auval tool included in Apple's Logic Pro to test and validate AudioUnits and the Audio Plugin Host included within JUCE that supports VST and AU plugins.
The auval tool validates AudioUnits before they can be loaded in Apple's plugin hosts such as Logic Pro X and Final Cut Pro X. It performs a variety of useful tests on your plugins but for the sake of this tutorial, we focus on the bus layout tests.
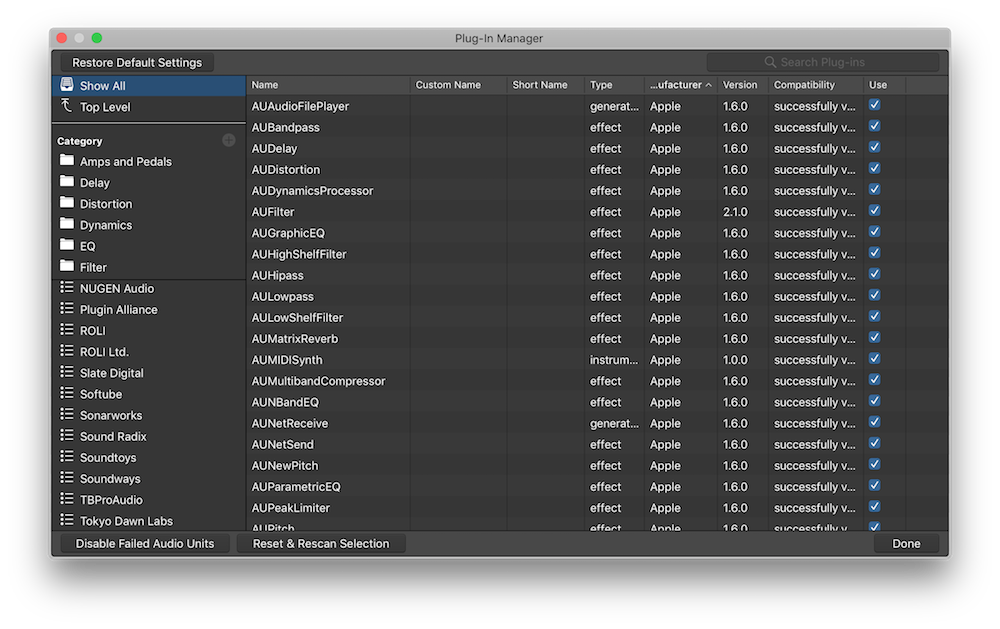
The auval tool can be accessed within Logic Pro X by navigating to Logic Pro X > Preferences > Plug-in Manager... and invoking the validation by clicking on Reset & Rescan Selection as shown here:
However we can also invoke it through the command line like so:
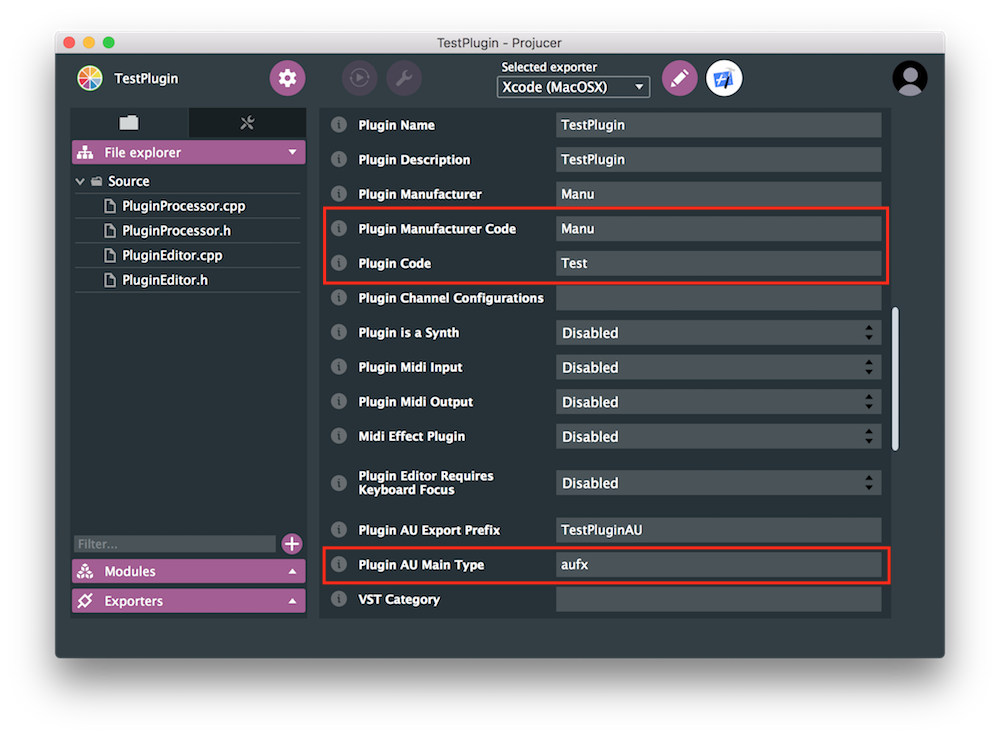
The first argument denotes the AU main type which defaults to 'aufx' when implementing an effects plugin, the second and third arguments are the plugin code and the manufacturer code as specified in the Projucer settings of your project:
As an example, the output of an AU validation looks something like the following:
As you can see in the above output, we can confirm that our test plugin only accepts mono-to-mono and stereo-to-stereo configurations which is what we want.
The other useful tool is the Audio Plugin Host included with JUCE that can be found in the JUCE/examples folder of the library. This tool allows you to test VST and AU plugins by changing the bus layouts at runtime.
Open the Audio Plugin Host and load an instance of the plugin you want to test. If you right click on the plugin and select Configure Audio I/O, you should see the following window appearing:
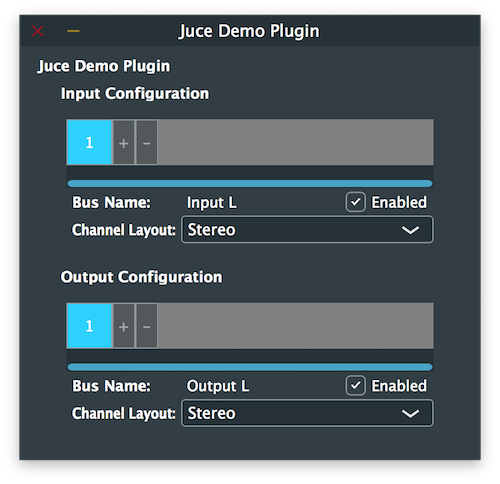
Here you can add or remove input or output buses, if your plugin allows it, change the channel set of the selected bus and enable/disable buses at your convenience.
Notice here that when you lead the plugin for the first time, you can see the input and output pins displaying the default BusesLayout configuration set in the AudioProcessor constructor.
After reading this tutorial, you should be able to: