
Loading...
Searching...
No Matches
Learn the basics of the MPE standard and how to implement a synthesiser that supports MPE. Hook your application up to a ROLI Seaboard Rise!
Level: Intermediate
Platforms: Windows, macOS, Linux
Classes: MPESynthesiser, MPEInstrument, MPENote, MPEValue, SmoothedValue
Download the demo project for this tutorial here: PIP | ZIP. Unzip the project and open the first header file in the Projucer.
If you need help with this step, see Tutorial: Projucer Part 1: Getting started with the Projucer.
The demo project is a simplified version of the MPEDemo project in the JUCE/examples directory. In order to get the most out of this tutorial you will need an MPE compatible controller. MPE stands for MIDI Polyphonic Expression, which is a new specification to allow multidimensional data to be communicated between audio products.
Some examples of such MPE compatible devices are ROLI's own Seaboard range (such as the Seaboard RISE).
With a Seaboard RISE connected to your computer the window of the demo application should look something like the following screenshot:
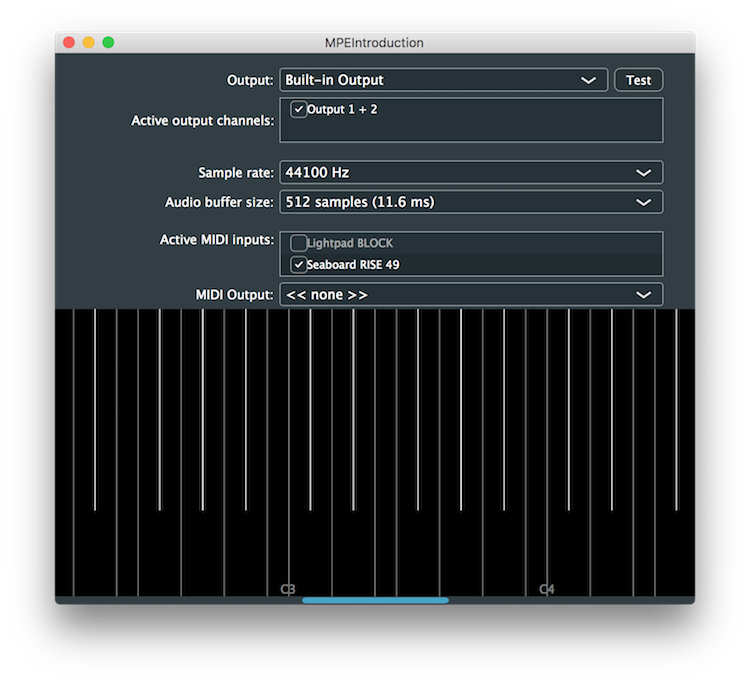
You will need to enable one of the MIDI inputs (here you can see a Seaboard RISE is shown as an option).
Any notes played on your MPE compatible device will be visualised in the lower portion of the window. This is shown in the following screenshot:
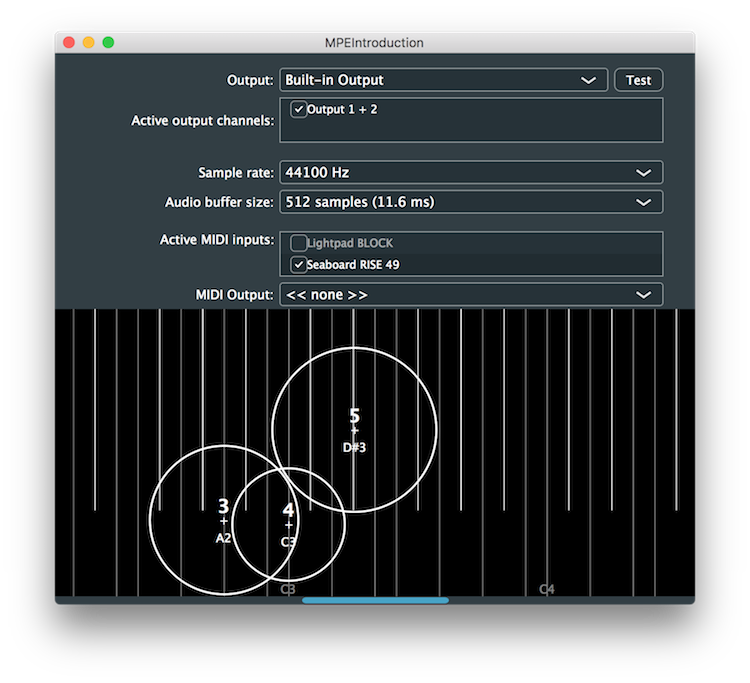
One key feature of MPE is that each new MIDI note event is assigned its own MIDI channel, rather than all notes from a particular controller keyboard being assigned to the same MIDI channel. This allows each individual note to be controlled independently by control change messages, pitch bend message, and so on. In the JUCE implementation of MPE, a playing note is represented by an MPENote object. An MPENote object encapsulates the following data:
With no notes playing you can see that the visualiser represents a conventional MIDI keyboard layout. Each note is represented in the visualiser in the demo application as follows:
Before delving further into other aspects of the MPE specification, which are demonstrated by this application, let's look at some of the other things our application uses.
First of all, our MainComponent class inherits from the AudioIODeviceCallback [1] and MidiInputCallback [2] classes:
We also have some important class members in our MainComponent class:
The AudioDeviceManager [3] class handles the audio and MIDI configuration on our computer, while the AudioDeviceSelectorComponent [4] class gives us a means of configuring this from the graphical user interface (see Tutorial: The AudioDeviceManager class). The MidiMessageCollector [5] class allow us to easily collect messages into blocks of timestamped MIDI messages in our audio callback (see Tutorial: Build a MIDI synthesiser).
It is important that the AudioDeviceManager object is listed first since we pass this to the constructor of the AudioDeviceSelectorComponent object:
Notice another important argument that is passed to the AudioDeviceSelectorComponent constructor: the showMidiInputOptions must be true to show our available MIDI inputs.
We set up our AudioDeviceManager object in a similar way to Tutorial: The AudioDeviceManager class, but we need also to add a MIDI input callback [6]:
The handleIncomingMidiMessage() is called when each MIDI message is received from any of the active MIDI inputs in the user interface:
Here we pass each MIDI message to both:
visualiserInstrument member — which is used to drive the visualiser display; andmidiCollector member — which in turn passes the messages to the synthesiser in the audio callback.Before any audio callbacks are made, we need to inform the synth and midiCollector members of the device sample rate, in the audioDeviceAboutToStart() function:
The audioDeviceIOCallbackWithContext() function appears to do nothing MPE-specific:
SynthAudioSource::getNextAudioBlock() function in Tutorial: Build a MIDI synthesiser.All of the MPE specific processing is handled by the MPE classes: MPEInstrument, MPESynthesiser, MPESynthesiserVoice, MPEValue, and MPENote (which we mentioned earlier).
The MPEInstrument class maintains the state of the currently playing notes according to the MPE specification. An MPEInstrument object can have one or more listeners attached and it can broadcast changes to notes as they occur. All you need to do is feed the MPEInstrument object the MIDI data and it handles the rest.
In the MainComponent constructor we configure the MPEInstrument in legacy mode and set the default pitch bend range to 24 semitones:
This special mode is for backwards compatibility with non-MPE MIDI devices and the instrument will ignore the current MPE zone layout.
In the MainComponent::handleIncomingMidiMessage() function we pass the MIDI messages on to our visualiserInstrument object:
In this example we are using an MPEInstrument object directly as we need it to update our visualiser display. For the purposes of audio synthesis we don't need to create a separate MPEInstrument object. The MPESynthesiser object contains an MPEInstrument object that it uses to drive the synthesiser.
We set our MPESynthesiser with the same configuration as our visualiserInstrument object (in legacy mode with a pitch bend range of 24 semitones):
The MPESynthesiser class can also handle voice stealing for us, but as you can see here, we turn this off. When voice stealing is enabled, the synth will try to take over an existing voice if it runs out of voices and needs to play another note.
As we have already seen in the MainComponent::audioDeviceAboutToStart() function we need to set the MPESynthesiser object's sample rate to work correctly:
And as we have also already seen in the MainComponent::audioDeviceIOCallback() function, we simply pass it a MidiBuffer object containing messages that we want it to use to perform its synthesis operation:
You can generally use the MPESynthesiser and MPEInstrument classes as they are (although both classes can be used as base classes if you need to override some behaviours). The most important class you must override in order to use the MPESynthesiser class is the MPESynthesiserVoice class. This actually generates the audio signals from your synthesiser's voices.
The code for our voice class is in the MPEDemoSynthVoice class of the demo project. Here we implement the MPEDemoSynthVoice class to inherit from the MPESynthesiserVoice class:
We have some member variables to keep track of values to control the level, timbre, and frequency of the tone that we generate. In particular, we use the SmoothedValue class, which is really useful for smoothing out discontinuities in the signal that would be otherwise caused by value changes (see Tutorial: Build a sine wave synthesiser).
The key to using the MPESynthesiserVoice class is to access its MPESynthesiserVoice::currentlyPlayingNote (protected) MPENote member to access the control information about the note during the various callbacks. For example, we override the MPESynthesiserVoice::noteStarted() function like this:
The following "five dimensions" are stored in the MPENote object as MPEValue objects:
MPEValue objects make it easy to create values from 7-bit or 14-bit MIDI value sources, and to obtain these values as floating-point values in the range 0..1 or -1..+1.
The MainComponent::noteStopped() function triggers the "release" of the note envelope (or stops it immediately, if requested):
SineWaveVoice::stopNote() function in Tutorial: Build a MIDI synthesiser. There isn't anything MPE-specific here.MainComponent::noteStopped() function to allow the note-off velocity (lift) to modify the rate of release of the note. Faster lifts should result in a shorter release time. There are callbacks that tell us when either the pressure, pitch bend, or timbre have changed for this note:
Again, we access the MPESynthesiserVoice::currentlyPlayingNote member to obtain the current value for each of these parameters.
The MainComponent::renderNextBlock() actually generates the audio signal, mixing this voice's signal into the buffer that is passed in:
It calls MainComponent::getNextSample() to generate the waveform:
endcode
This simply cross fades between a sine wave and a (non-bandlimited) square wave, based on the value of the timbre parameter.
MPEDemoSynthVoice class to crossfade between two sine waves, one octave appart, in response to the timbre parameter. In this tutorial we have introduced some of the MPE based classes in JUCE. You should now know: