This tutorial covers how to open and play sound files. This includes some important classes for handling sound files in JUCE.
Level: Intermediate
Platforms: Windows, macOS, Linux
Classes: AudioFormatManager, AudioFormatReader, AudioFormatReaderSource, AudioTransportSource, FileChooser, ChangeListener, File, FileChooser
Download the demo project for this tutorial here: PIP | ZIP. Unzip the project and open the first header file in the Projucer.
If you need help with this step, see Tutorial: Projucer Part 1: Getting started with the Projucer.
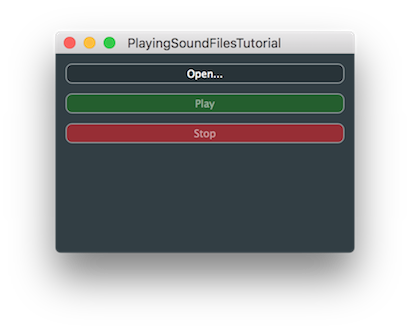
The demo project presents a three-button interface for controlling the playback of a sound file. The three buttons are:
The interface is shown in the following screenshot:

While we can generate audio sample-by-sample in the getNextAudioBlock() of the Audio Application template, there are some built-in tools for generating and processing audio. These allow us to link together high-level building blocks to form powerful audio applications without having to process each and every sample of audio within our application code (JUCE does this on our behalf). These building blocks are based on the AudioSource class. In fact, if you have followed any of the tutorials based on the AudioAppComponent class — for example, Tutorial: Build a white noise generator — then you have been making use of the AudioSource class already. The AudioAppComponent class itself inherits from the AudioSource class and, importantly, contains an AudioSourcePlayer object that streams the audio between the AudioAppComponent and the audio hardware device. We can simply generate the audio samples directly in the getNextAudioBlock() function but we can instead chain a number of AudioSource objects together to form series of processes. We make use of this feature in this tutorial.
JUCE provides number of tools for reading and writing sound files in a number of formats. In this tutorial we make use of several of these, in particular we use the following classes:
float values). When an AudioFormatManager object is asked to open a particular file, it creates instances of this class.getNextAudioBlock() function.We will now bring together these classes along with suitable user interface classes to make our sound file playing application. It is useful at this point to think about the various phases — or transport states — of playing an audio file. Once the audio file is loaded we can consider these four possible states:
To represent these states, we create an enum within our MainContentComponent class:
In the constructor for our MainContentComponent class, we configure the three buttons:
Notice in particular that we disable the Play and Stop buttons initially. The Play button is enabled once a valid file is loaded. We can see here that we have assigned a lambda function to the Button::onClick helper objects for each of these three buttons (see Tutorial: Listeners and Broadcasters). We also initialise our transport state in the constructor's initialiser list.
In addition to the three TextButton objects we have four other members of our MainContentComponent class:
Here we see the AudioFormatManager, AudioFormatReaderSource, and AudioTransportSource classes mentioned earlier.
In the MainContentComponent constructor we need to initialise the AudioFormatManager object to register a list of standard formats [1]:
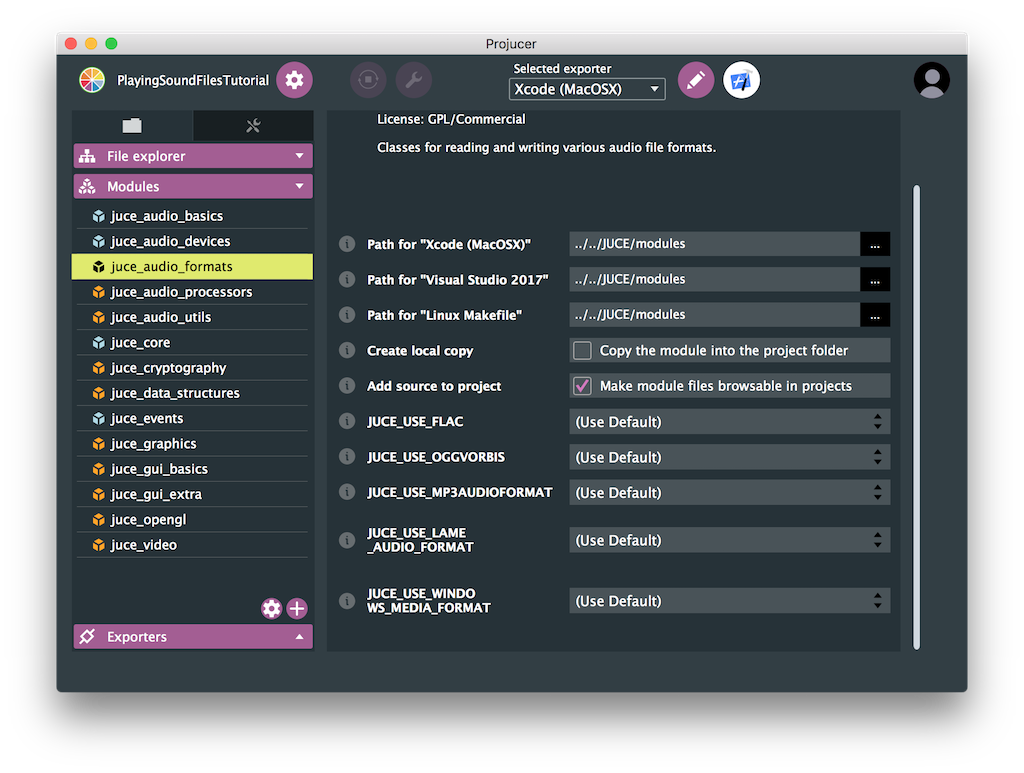
As a minimum this will enable the AudioFormatManager object to create readers for the WAV and AIFF formats. Other formats may be available depending on the platform and the options enabled in the juce_audio_formats module within the Projucer project as shown in the following screenshot:

In the MainContentComponent constructor we also add our MainContentComponent object as a listener [2] to the AudioTransportSource object so that we can respond to changes in its state (for example, when it stops):
addChangeListener() in this case, rather than simply addListener() as it is with many other listener classes in JUCE.When changes in the transport are reported, the changeListenerCallback() function will be called. This will be called asynchronously on the message thread:
You can see that this just calls a member function changeState().
The changing of the transport state is localised into this single function changeState(). This helps keep all of the logic for this functionality in one place. This function updates the state member and triggers any changes to other objects that need to take place when in this new state.
changeListenerCallback() function. Here we enable the Stop button.The audio processing in this demo project is very straightforward: we simply hand off the processing to the AudioTransportSource object by passing it the AudioSourceChannelInfo struct that we have been passed via the AudioAppComponent class:
Notice that we check if there is a valid AudioFormatReaderSource object first and simply zero the output if not (using the convenient AudioSourceChannelInfo::clearActiveBufferRegion() function). The AudioFormatReaderSource member is stored in a std::unique_ptr object because we need to create these objects dynamically based on the user's actions. It also allows us to check for nullptr for invalid objects.
We also need to remember to pass the prepareToPlay() callback to any other AudioSource objects we are using:
And the releaseResources() callback too:
To open a file we pop up a FileChooser object in response to the Open... button being clicked:
.wav files.if() will succeed if the user actually selects a file (rather than cancelling)nullptr value if it fails (for example the file is not an audio format the AudioFormatManager object can handle).true indicates that we want the AudioFormatReaderSource object to manage the AudioFormatReader object and delete it when it is no longer needed. We store the AudioFormatReaderSource object in a temporary std::unique_ptr object to avoid deleting a previously allocated AudioFormatReaderSource prematurely on subsequent commands to open a file.getNextAudioBlock() function. In case the sample rate of the file doesn't match the hardware sample rate we pass this in as the fourth argument, which we obtain from the AudioFormatReader object. See Notes for more information on the second and third arguments. The AudioTransportSource source will handle any sample rate conversion that is necessary.readerSource member. (As mentioned in Processing the audio above.) To do this we must transfer ownership from the local newSource variable by using std::unique_ptr::release().Since we have already set up the code to actually play the file, we need only call our changeState() function with the appropriate argument to play the file. When the Play button is clicked, we do the following:
Stopping the file is similarly straightforward, when the the Stop button is clicked:
filePatternsAllowed) argument when creating the FileChooser object to allow the application to load AIFF files too. The file patterns can be separated by a semicolon so this should be "*.wav;*.aif;*.aiff" to allow for the two common file extensions for this format. We will now walk through some steps to add a pause functionality to the application. Here we will make the Play button become a Pause button while the file is playing (instead of just disabling it). We will also make the Stop button become a Return to zero button while the sound file is paused.
First of all we need to add two states Pausing and Paused to our TransportState enum:
Our changeState() function needs to handle the two new states and the code for the other states needs to be updated too:
We enable and disable the buttons appropriately, and update the button text correctly in each state.
Notice that we actually stop the transport when asked to pause in the Pausing state. In the changeListenerCallback() function, we need to change the logic to move to the correct state depending on whether a pause or stop request was made:
We need to change the code when the Play button is clicked:
And when the Stop button is clicked:
And that's it: you should be able to build and run the application now.
PlayingSoundFilesTutorial_02.h file of the demo project.MainContentComponent class inherit from the Timer class and perform periodic updates in your timerCallback() function to update the label. You could even use the RelativeTime class to convert the raw time in seconds to a more useful format in minutes, seconds, and milliseconds. PlayingSoundFilesTutorial_03.h file of the demo project.In this tutorial we have introduced the reading and playing of sound files. In particular we have covered the following things:
The second and third arguments to the AudioTransportSource::setSource() function allow you to control look ahead buffering on a background thread. The second argument is the buffer size to use and the third argument is a pointer to a TimeSliceThread object, which is used for the background processing. In this example we use a zero buffer size and a nullptr value for the thread object, which is the default.