Sell consumable and non-consumable In-App Purchases in your desktop and mobile applications. Learn how to setup and process payments for IAP products on both macOS/iOS and Android devices.
Advanced
macOS, iOS, Android
InAppPurchases::Listener, SoundPlayer, AsyncUpdater, ListBoxModel
- Warning
- This project requires Apple Developer and iTunes Connect accounts on macOS/iOS and a Google Play Developer account on Android. If you need help with this, follow the instructions on the Apple Developer, iTunes Connect and Google Play Developer websites to open up these accounts.
-
This project also requires a physical device to test in-app purchases as simulators do not support IAP testing. Please make sure you have a device ready for this.
Getting started
Download the demo project for this tutorial here: PIP | ZIP. Unzip the project and open the first header file in the Projucer.
- Warning
- If using the PIP version of this project, please make sure to copy the
Resources folder into the generated Projucer project.
If you need help with this step, see Tutorial: Projucer Part 1: Getting started with the Projucer.
The demo project
The project offers different voices that can be acquired through in-app purchases to provide several auditive flavours when phrases are played using speech dictation. By default, the user has access to a generic robotic voice but will inevitably want to try JUCE developer voices instead. If we run the mobile application in the iOS simulator, the window should look something like this:
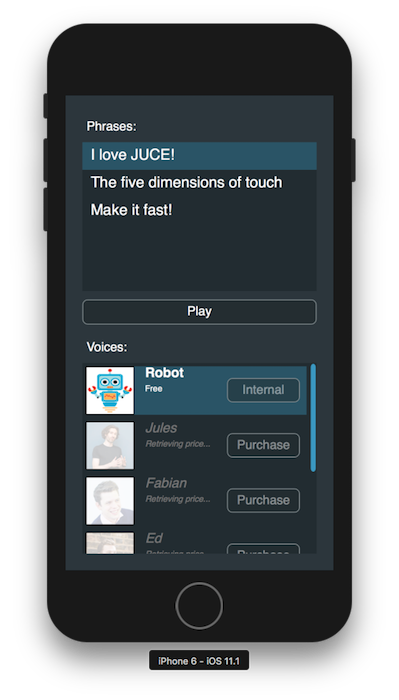
The demo project app window on iOS
- Note
- Since the application is running in the simulator, it is expected behaviour to see our products greyed out and the prices being fetched indefinitely.
- Warning
- Although this is a tutorial project, unless you are in sandbox mode or logged in as a test user, if you try to purchase an item your credit card will be charged!
- Note
- The code presented here is broadly similar to the InAppPurchase from the JUCE Examples.
Initial Setup
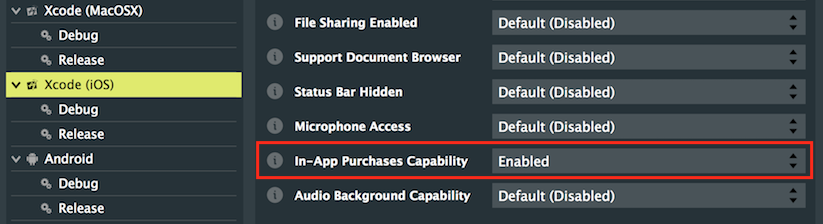
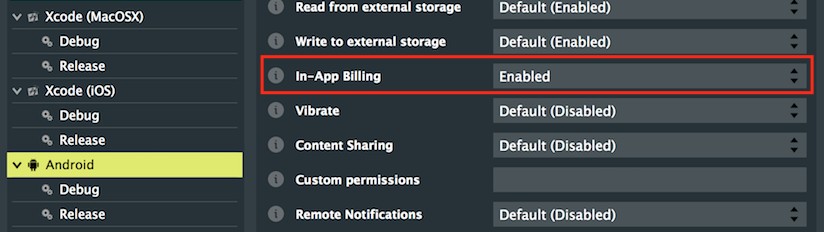
In order for this project to function properly, we have to perform some initial setup procedures with appropriate developer consoles for specific deployment platform. Let's first allow appropriate permissions for in-app purchases in the Projucer. Under macOS/iOS, make sure that the In-App purchases capability checkbox is ticked. Under Android, make sure that the In-App Billing checkbox is ticked.
Project settings window on iOS
Project settings window on Android
The Projucer will automatically add the required entitlements to your deployment targets when saving the project and opening in your favourite IDE.
Apple Developer
- Note
- If developing for Android, please skip to the next section Google Play Developer for instructions.
On macOS and iOS, you will need to sign in with your Apple Developer account within Xcode and choose a development team in order to sign the application. Choose a unique bundle ID for your project. Xcode should automatically provide you with a Signing Certificate and Provisioning Profile as shown in the following screenshot:

General settings window in Xcode
Also make sure that the correct app capabilities have been ticked and approved in the Capabilities settings window. You should see the same information as follows:

Capabilities settings window in Xcode
iTunes Connect
For the in-app purchases to display properly on iOS, we need to create IAP products in iTunes Connect. First, create a new app in your dashboard under My Apps. If you navigate to the Features tab of your app, you can access the In-App Purchases feature on the following screen:
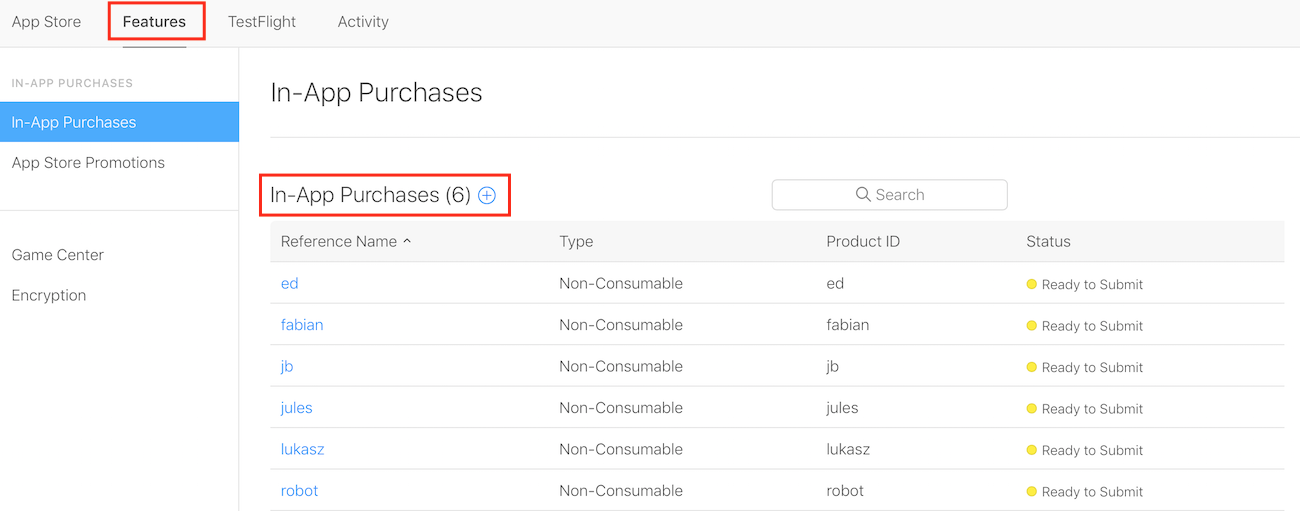
Create IAP products in iTunes Connect
Click on the + sign to create six products that correspond with the options in the app with appropriate names and prices.
Google Play Developer
- Note
- If developing for macOS/iOS, please jump to the previous section Apple Developer for instructions.
For the in-app purchases to display properly on Android, we need to create in-app billing products in the Google Play Console. First, navigate to your app page from the All applications panel and open up the In-app Products page under Store presence. You can access the items under the Managed products tab as shown on the following screen:
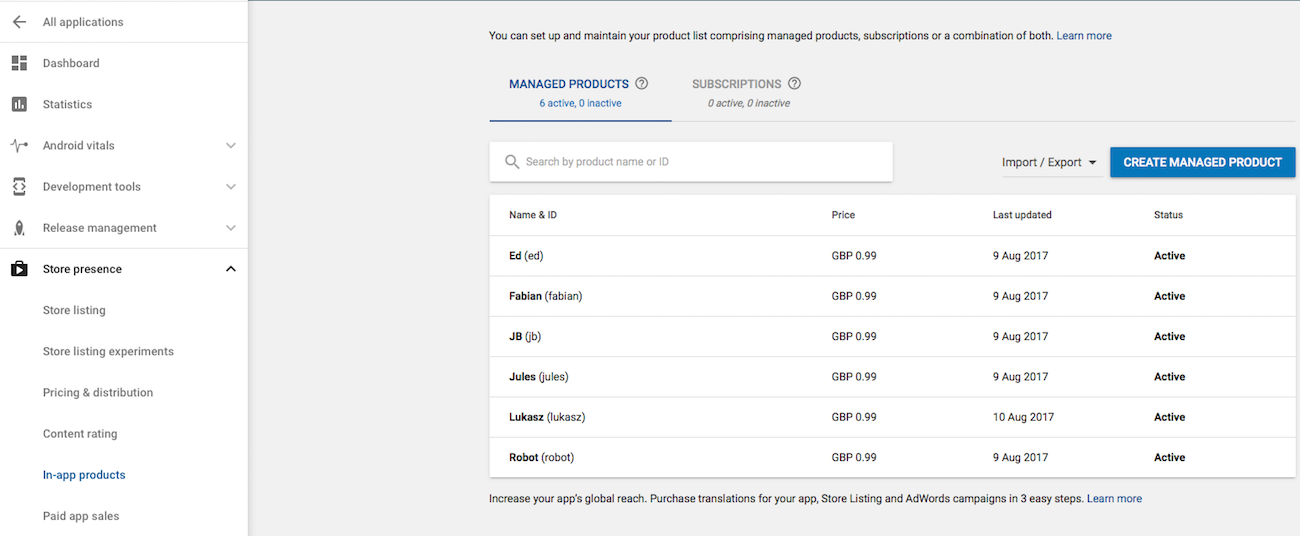
Create IAB products in the Google Play Console
Click on Create managed product to create six products that correspond with the options in the app with appropriate names and prices.
- Note
- Due to Google Play restrictions on product IDs, it is recommended to use only numbers (0-9), lower case letters (a-z), underscores (_) or full stops (.) in product IDs. This way you can have the same product ID used both in the AppStore and the PlayStore. Otherwise your app would have to handle different product IDs for the same product.
Generate Android APK
In order for in-app purchases to function properly on Android, we have to sign the Android version of the app and authenticate the requests to the Google Play store API. First launch Android Studio and navigate to the menu bar under Build > Generate Signed APK...:
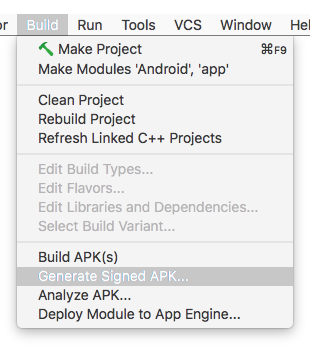
Generate signed APK from menu bar
You will then be prompted to enter the location, alias and passwords for the keystore file like so:
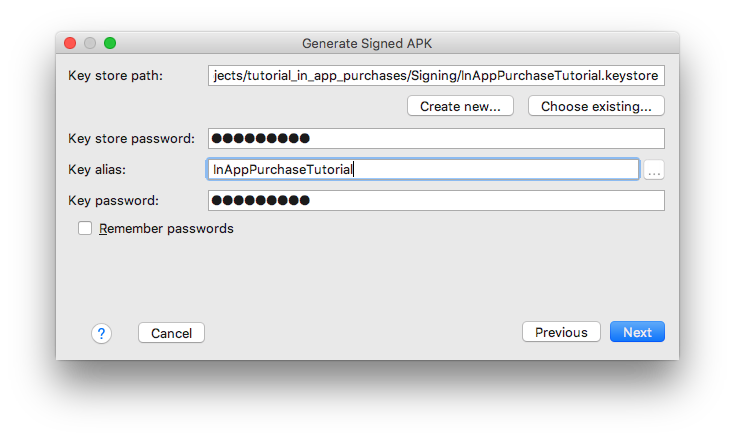
Enter aliases and passwords for keystore file
Next, select release build type, "release_" flavour and ensure that both V1 and V2 signatures are checked.
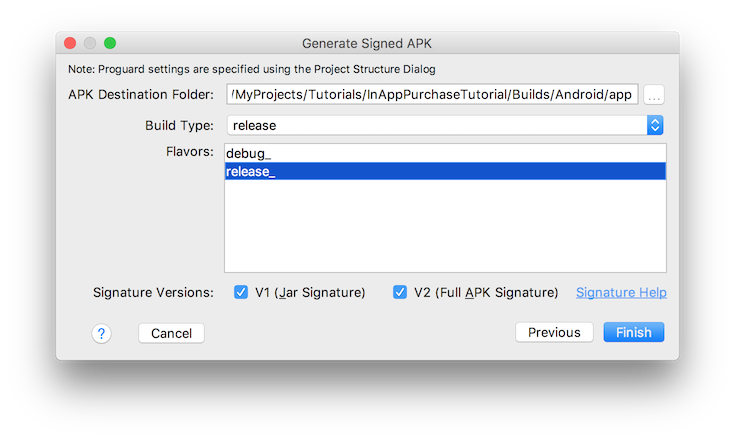
Build type, flavours and signature versions
This will generate the keystore file that you can now refer to in the Projucer. Under the Android release settings, enter the relative path, alias and passwords to the keystore file in the Key Signing fields:
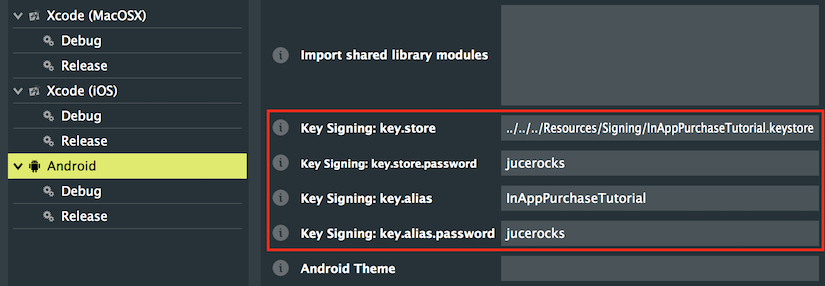
Path for keystore file in release settings
Setup for in-app purchases should be complete by now and we can finally start implementing these features into the app.
Purchase Types
In-App Purchases are useful to offer customers extra content and features directly within the app. They can be premium functionalities, exclusive items or even subscriptions. In general, there are four main types of puchases on all relevant platforms:
- Consumables: Countable items that can be used and purchased multiple times.
- Non-Consumables: One-time purchases that unlock features of the app perpetually.
- Auto-Renewable Subscriptions: Periodically updated content on a recurring basis until cancellation.
- Non-Renewing Subscriptions: Time-limited content that needs to be manually renewed.
In this tutorial, we will implement non-consumable in-app purchases.
Project structure
The project is structured using the following classes to handle different parts of the application:
- MainContentComponent: Lays out the GUI components on the screen and handles playing of sound files on play/stop button click.
- PhraseModel: ListBoxModel to describe available phrases to play using purchased voices.
- VoiceModel: ListBoxModel to describe available voices that can be purchased to play phrases with.
- VoiceRow: Custom row Component for the VoiceModel class to display pictures and information for specific voice entries.
- VoicePurchases: Class to manage VoiceProduct purchases that handles purchases and encapsulates the InAppPurchases instance.
- VoiceProduct: Struct to describe a single purchasable product with information such as price, name and whether purchased before.
As we can see, it roughly follows an MVC design pattern to separate application functionalities into separate classes.
The VoiceProduct struct contains useful information for non-consumable products namely the following variables:
- const char* identifier: A unique identifier referred to by iTunes Connect and Google Play.
- const char* humanReadable: A human-readable version of the identifier to display in the app.
- bool isPurchased: Whether the item has been purchased before by the logged in user.
- bool priceIsKnown: Whether the price has been loaded and retrieved to be displayed.
- bool purchaseInProgress: Whether the user has initiated a purchase that is currently in progress.
- String purchasePrice: A localised string that displays the product price in the local currency.
- Exercise
- What kind of information would we need for consumable purchases? What about subscriptions? Think about what should be added or removed.
Displaying products
Let's start by displaying the IAP products that we want to sell in the user interface. In the VoicePurchases constructor of the VoicePurchases class, we have initialised the VoiceProduct objects using the structure described above like so:
VoicePurchases()
{
voiceProducts = juce::Array<VoiceProduct>(
{ VoiceProduct {"robot", "Robot", true, true, false, "Free" },
VoiceProduct {"jules", "Jules", false, false, false, "Retrieving price..." },
VoiceProduct {"fabian", "Fabian", false, false, false, "Retrieving price..." },
VoiceProduct {"ed", "Ed", false, false, false, "Retrieving price..." },
VoiceProduct {"lukasz", "Lukasz", false, false, false, "Retrieving price..." },
VoiceProduct {"jb", "JB", false, false, false, "Retrieving price..." } });
}
- Warning
- These product IDs need to match exactly with the values on iTunes Connect and Google Play Console in order to work properly.
In order to easily retrieve human-readable versions of all our products, we have implemented a helper function that returns a StringArray of all capitalised names:
juce::StringArray getVoiceNames() const
{
juce::StringArray names;
for (auto& voiceProduct : voiceProducts)
names.add (voiceProduct.humanReadable);
return names;
}
Let's create another helper function in the same class called findVoiceIndexFromIdentifier() to get the index of a VoiceProduct when passed an identifier. This private function will be helpful later on when dealing with callbacks from the InAppPurchases object:
int findVoiceIndexFromIdentifier (juce::String identifier) const
{
identifier = identifier.toLowerCase();
for (auto i = 0; i < voiceProducts.size(); ++i)
if (juce::String (voiceProducts.getReference (i).identifier) == identifier)
return i;
return -1;
}
The InAppPurchases class works as a broadcaster so let's inherit from InAppPurchases::Listener to become a listener for this class and receive callbacks from the IAP server :
class VoicePurchases : private juce::InAppPurchases::Listener
{
public:
We can now start overriding the InAppPurchases callback functions in our VoicePurchases class. First, implement the productsInfoReturned() function. This function gets called to return product information after a call to InAppPurchases::getProductsInformation().
void productsInfoReturned (const juce::Array<juce::InAppPurchases::Product>& products) override
{
if (! juce::InAppPurchases::getInstance()->isInAppPurchasesSupported())
{
for (auto idx = 1; idx < voiceProducts.size(); ++idx)
{
auto& voiceProduct = voiceProducts.getReference (idx);
voiceProduct.isPurchased = false;
voiceProduct.priceIsKnown = false;
voiceProduct.purchasePrice = "In-App purchases unavailable";
}
juce::AlertWindow::showMessageBoxAsync (juce::AlertWindow::WarningIcon,
"In-app purchase is unavailable!",
"In-App purchases are not available. This either means you are trying "
"to use IAP on a platform that does not support IAP or you haven't setup "
"your app correctly to work with IAP.",
"OK");
}
else
{
for (auto product : products)
{
auto idx = findVoiceIndexFromIdentifier (product.identifier);
if (juce::isPositiveAndBelow (idx, voiceProducts.size()))
{
auto& voiceProduct = voiceProducts.getReference (idx);
voiceProduct.priceIsKnown = true;
voiceProduct.purchasePrice = product.price;
}
}
juce::AlertWindow::showMessageBoxAsync (juce::AlertWindow::WarningIcon,
"Your credit card will be charged!",
"You are running the sample code for JUCE In-App purchases. "
"Although this is only sample code, it will still CHARGE YOUR CREDIT CARD!",
"Understood!");
}
guiUpdater.triggerAsyncUpdate();
}
- : First, check whether in-app purchases are supported on your platform and that setup was correctly performed.
- : For all VoiceProduct objects except the first free one, set their variables to reflect unavailability of products.
- : Optionally show a message box asynchronously to explain the issue to the user.
- : For all VoiceProduct objects if in-app purchases are available, retrieve the index from the identifier with the previously implemented helper function.
- : If the index is valid, set the product variables to reflect availability of the product.
- : Optionally show a message box asynchronously explaining that users will be charged.
Retrieving purchases
- Warning
- This section will only work on a physical device. Do not attempt on a simulator as it will not function properly.
When dealing with in-app purchases, the very first thing your application should check is for past purchases when the user signs in. As a customer, one of the most frustrating things that can happen is to lose previous purchases made on another device or on a previous version of the same app. So let's make sure that the user gets an updated view of the products page as soon as possible on app startup.
First, create additional private variables in the VoicePurchases class to store temporary states of the app :
bool havePurchasesBeenRestored = false, havePricesBeenFetched = false, purchaseInProgress = false;
juce::Array<VoiceProduct> voiceProducts;
};
We also need a new helper function called getPurchase() to retrieve a VoiceProduct from an index. In this function, we also insert initialisation code for when this function is first called:
VoiceProduct getPurchase (int voiceIndex)
{
if (! havePurchasesBeenRestored)
{
havePurchasesBeenRestored = true;
juce::InAppPurchases::getInstance()->addListener (this);
juce::InAppPurchases::getInstance()->restoreProductsBoughtList (true);
}
return voiceProducts[voiceIndex];
}
- : If this is the first time this function is called, make sure this code segment does not get called again.
- : Add this class as a listener to the InAppPurchases instance to receive callbacks.
- : We can then call the
restoreProductsBoughtList() function to trigger the restoration process and wait for the subsequent callback.
- : Finally, return the VoiceProduct at the specified index. This will get called every time as normal behaviour for this function.
Since the VoicePurchases class gets registered as a listener when the above function gets initially called, we need to make sure we unregister when this class gets destroyed. Remove the class as an InAppPurchases listener in the class destructor:
~VoicePurchases() override
{
juce::InAppPurchases::getInstance()->removeListener (this);
}
In the previously defined getPurchase() function, we called the restoreProductsBoughtList() function to trigger a callback to restore our purchases. Now let's implement that callback function called purchasesListRestored():
void purchasesListRestored (const juce::Array<PurchaseInfo>& infos, bool success, const juce::String&) override
{
if (success)
{
for (auto& info : infos)
{
for (const auto& productId : info.purchase.productIds)
{
auto idx = findVoiceIndexFromIdentifier (productId);
if (juce::isPositiveAndBelow (idx, voiceProducts.size()))
{
auto& voiceProduct = voiceProducts.getReference (idx);
voiceProduct.isPurchased = true;
}
}
}
guiUpdater.triggerAsyncUpdate();
}
if (! havePricesBeenFetched)
{
havePricesBeenFetched = true;
juce::StringArray identifiers;
for (auto& voiceProduct : voiceProducts)
identifiers.add (voiceProduct.identifier);
juce::InAppPurchases::getInstance()->getProductsInformation (identifiers);
}
}
- : If the response from the server is successful, we can update our purchase list. Using the helper function, find the index of the voice from the identifier.
- : If the index is valid, set the appropriate variables of the VoiceProduct object to reflect its purchase state.
- : When this callback function gets called the first time around, we need to initialise the purchase prices. Make sure this code segment does not get called a second time.
- : Initiate the request to retrieve product prices on the InAppPurchases instance by calling the
getProductsInformation() function.
In order to update the GUI for these in-app purchases products, it would be useful to have temporary variables to store purchase states. Let's declare these as private member variables in the VoiceRow subclass of the VoiceModel class:
bool isSelected = false, hasBeenPurchased = false, purchaseInProgress = false;
int rowSelected = -1;
juce::Image avatar;
At the moment, all the in-app purchases products look visually the same and do not clearly indicate their availability in a visually-striking manner. Let's apply a different look and feel to purchasable products. In the paint() function, modify the code to apply a white background to the product image when available and a white semi-transparent overlay when unavailable :
void paint (juce::Graphics& g) override
{
auto r = getLocalBounds().reduced (4);
{
auto voiceIconBounds = r.removeFromLeft (r.getHeight());
g.setColour (juce::Colours::black);
g.drawRect (voiceIconBounds);
voiceIconBounds.reduce (1, 1);
g.setColour (hasBeenPurchased ? juce::Colours::white :
juce::
Colours::
grey);
g.fillRect (voiceIconBounds);
g.drawImage (avatar, voiceIconBounds.toFloat());
if (! hasBeenPurchased)
{
g.setColour (juce::Colours::white.withAlpha (0.8f));
g.fillRect (voiceIconBounds);
Also modify the code in the update() function to reflect purchase status on the name and price labels. Use the previously defined helper function to retrieve the VoiceProduct from the row index first and set the temporary variable to indicate whether the item was purchased . Then update the GUI accordingly as follows:
void update (int rowNumber, bool rowIsSelected)
{
isSelected = rowIsSelected;
rowSelected = rowNumber;
if (juce::isPositiveAndBelow (rowNumber, voices.size()))
{
auto imageResourceName = voices[rowNumber] + ".png";
nameLabel.setText (voices[rowNumber], juce::NotificationType::dontSendNotification);
auto purchase = purchases.getPurchase (rowNumber);
hasBeenPurchased = purchase.isPurchased;
if (rowNumber == 0)
{
purchaseButton.setButtonText ("Internal");
purchaseButton.setEnabled (false);
}
else
{
purchaseButton.setButtonText (hasBeenPurchased ? "Purchased" : "Purchase");
purchaseButton.setEnabled (! hasBeenPurchased && purchase.priceIsKnown);
}
setInterceptsMouseClicks (! hasBeenPurchased, ! hasBeenPurchased);
In this piece of code, we mainly update the font styles of the name and price labels to remain as default when the item is purchased and change its colour to white. In addition, we enable the purchase buttons if the corresponding product is available for purchase. We also need to disable mouse clicks on these buttons after purchase to avoid errors when charging the customer .
Purchasing products
- Warning
- This section will only work on a physical device. Do not attempt on a simulator as it will not function properly.
We have yet to implement purchasing behaviour in our app so let's do that. Implement a purchaseVoice() public function in the VoicePurchases class that transfers the request to the InAppPurchases instance:
void purchaseVoice (int voiceIndex)
{
if (havePricesBeenFetched && juce::isPositiveAndBelow (voiceIndex, voiceProducts.size()))
{
auto& product = voiceProducts.getReference (voiceIndex);
if (! product.isPurchased)
{
purchaseInProgress = true;
product.purchaseInProgress = true;
juce::InAppPurchases::getInstance()->purchaseProduct (product.identifier);
- : First check whether the prices were fetched before retrieving the VoiceProduct using the index.
- : If the product was not previously purchased, enter purchasing state by setting the appropriate variable.
- : We can now safely request the InAppPurchases instance to purchase the product by specifying the correct identifier.
This will trigger a callback from the server when the purchasing has ended and a response was received. We implement this productPurchaseFinished() callback here:
void productPurchaseFinished (const PurchaseInfo& info, bool success, const juce::String&) override
{
purchaseInProgress = false;
for (const auto& productId : info.purchase.productIds)
{
auto idx = findVoiceIndexFromIdentifier (productId);
if (juce::isPositiveAndBelow (idx, voiceProducts.size()))
{
auto& voiceProduct = voiceProducts.getReference (idx);
voiceProduct.isPurchased = success;
voiceProduct.purchaseInProgress = false;
}
else
{
for (auto& voiceProduct : voiceProducts)
voiceProduct.purchaseInProgress = false;
}
}
guiUpdater.triggerAsyncUpdate();
}
Using the same helper function as before, retrieve the VoiceProduct index from its identifier and set appropriate variables on the object in question depending on whether the purchase was successful and exit purchasing state .
To indicate the purchasing state to the user while waiting for the response from the server, display a spinning animation in the paint() function of the VoiceModel class :
if (! hasBeenPurchased)
{
g.setColour (juce::Colours::white.withAlpha (0.8f));
g.fillRect (voiceIconBounds);
if (purchaseInProgress)
getLookAndFeel().drawSpinningWaitAnimation (g, juce::Colours::darkgrey,
voiceIconBounds.getX(),
voiceIconBounds.getY(),
voiceIconBounds.getWidth(),
voiceIconBounds.getHeight());
}
}
}
Let's implement the clickPurchase() function to initiate the purchasing process when the user interacts with the UI:
void clickPurchase()
{
if (rowSelected >= 0)
{
if (! hasBeenPurchased)
{
purchases.purchaseVoice (rowSelected);
purchaseInProgress = true;
startTimer (1000 / 50);
}
}
}
void timerCallback() override { repaint(); }
- : If the row index is valid and the item was not purchased before, call the
purchaseVoice() function and enter purchasing state.
- : Start a timer to update the spinning wheel animation while the purchase is in progress.
- : Implement the timer callback to repaint the screen for the animation.
Lastly in the update() function, retrieve the purchasing state for the row-specific product and stop the spinning animation if the purchase is finished by calling the stopTimer() function :
purchaseInProgress = purchase.purchaseInProgress;
if (purchaseInProgress)
startTimer (1000 / 50);
else
stopTimer();
The mechanics to handle product purchasing and retrieval of product information have all been implemented at this point in the tutorial but we still need to tell the GUI when to update itself.
Handling async updates
Since purchases and synchronisation with the IAP server are performed on a separate thread, we need to handle responses in an asynchronous manner. In the MainContentComponent class, let's inherit from the AsyncUpdater class and pass a reference of this class to the VoicePurchases instance :
class MainContentComponent : public juce::Component,
private juce::AsyncUpdater
{
juce::SoundPlayer player;
VoicePurchases purchases { *this };
juce::AudioDeviceManager dm;
In the VoicePurchases constructor and member initialisation list, assign a reference to the AsyncUpdater instance in a private variable :
VoicePurchases (juce::AsyncUpdater& asyncUpdater)
: guiUpdater (asyncUpdater)
{
Declare that variable as a private member to be able to refer to the AsyncUpdater later on :
juce::AsyncUpdater& guiUpdater;
Now in the purchaseVoice() function and all the callback functions of the InAppPurchases instance namely productsInfoReturned(), purchasesListRestored() and productPurchaseFinished(), trigger an asynchronous update to the GUI as a last step to the corresponding code segments :
void purchaseVoice (int voiceIndex)
{
if (havePricesBeenFetched && juce::isPositiveAndBelow (voiceIndex, voiceProducts.size()))
{
if (! product.isPurchased)
{
guiUpdater.triggerAsyncUpdate();
}
}
}
void productsInfoReturned (const juce::Array<InAppPurchases::Product>& products) override
{
guiUpdater.triggerAsyncUpdate();
}
void productPurchaseFinished (const PurchaseInfo& info, bool success, const juce::String&) override
{
guiUpdater.triggerAsyncUpdate();
}
void purchasesListRestored (const juce::Array<PurchaseInfo>& infos, bool success, const juce::String&) override
{
if (success)
{
guiUpdater.triggerAsyncUpdate();
}
}
Now whenever the triggerAsyncUpdate() function is called on the AsyncUpdater instance in the VoicePurchases class, we can handle the callback in the handleAsyncUpdate() function to update any outdated GUI components :
void handleAsyncUpdate() override
{
voiceListBox.updateContent();
voiceListBox.setEnabled (! purchases.isPurchaseInProgress());
voiceListBox.repaint();
}
Add the following getter in the VoicePurchases class as a public helper function:
This ensures that the GUI is updated whenever purchases are made or retrieved. You should now see previously-made in-app purchases when the app is launched again.
- Exercise
- Implement consumable versions of these IAP products by consuming tokens every time the user plays a phrase with a particular voice.
Playing sounds
When the user clicks on the play button, we need to trigger the correct audio file to play using the right voice and phrase. The audio files are stored as binary resources using the name of the voice and an index relating to the phrase number as a naming convention. In the MainContentComponent class, we handle the behaviour as follows:
void playStopPhrase()
{
juce::MemoryOutputStream resourceName;
auto idx = voiceListBox.getSelectedRow();
if (juce::isPositiveAndBelow (idx, soundNames.size()))
{
resourceName << soundNames[idx] << phraseListBox.getSelectedRow() << ".ogg";
auto dir = juce::File::getCurrentWorkingDirectory();
int numTries = 0;
while (! dir.getChildFile ("Resources").exists() && numTries++ < 15)
dir = dir.getParentDirectory();
auto file = dir.getChildFile ("Resources").getChildFile ("Sounds").getChildFile (resourceName.toString().toRawUTF8());
if (file.exists())
player.play (file);
}
}
- : First, retrieve the index for the selected row in the voice table and check if the index is valid against the array of audio files.
- : Next, construct the correct file name using a MemoryOutputStream object and the naming convention as described above.
- : Finally, check whether the audio file can be loaded based on the file name constructed previously and call the
play() function of the SoundPlayer with the corresponding file.
You should now be able to hear the spoken phrase with the corresponding voice when the play button is pressed.
- Note
- The source code for this modified version of the code can be found in the
InAppPurchaseTutorial_02.h file of the demo project.
Summary
In this tutorial, we have learnt how to handle In-App Purchases on mobile and desktop. In particular, we have:
- Covered preliminary setup for different deployment platforms.
- Displayed various IAP product information on the user interface.
- Retrieved past user purchases and asynchronously updated the GUI accordingly.
- Handled purchasing of non-consumable products within the app.
See also
