
Loading...
Searching...
No Matches
This tutorial introduces simple synthesis and audio output. This is key to developing an understanding of audio application (and plug-in) concepts in JUCE.
Level: Intermediate
Platforms: Windows, macOS, Linux
Classes: AudioAppComponent, AudioSourceChannelInfo, AudioBuffer, Random
Download the demo project for this tutorial here: PIP | ZIP. Unzip the project and open the first header file in the Projucer.
If you need help with this step, see Tutorial: Projucer Part 1: Getting started with the Projucer.
This tutorial assumes that you are familiar with the basic principles of digital audio. In particular, you should know how audio signals are represented using sampling. You should also be familiar with the idea of the sample rate in this context (which you may know as sampling rate, sampling frequency, or other similar terms).
The demo project was created using The Projucer Audio Application template.
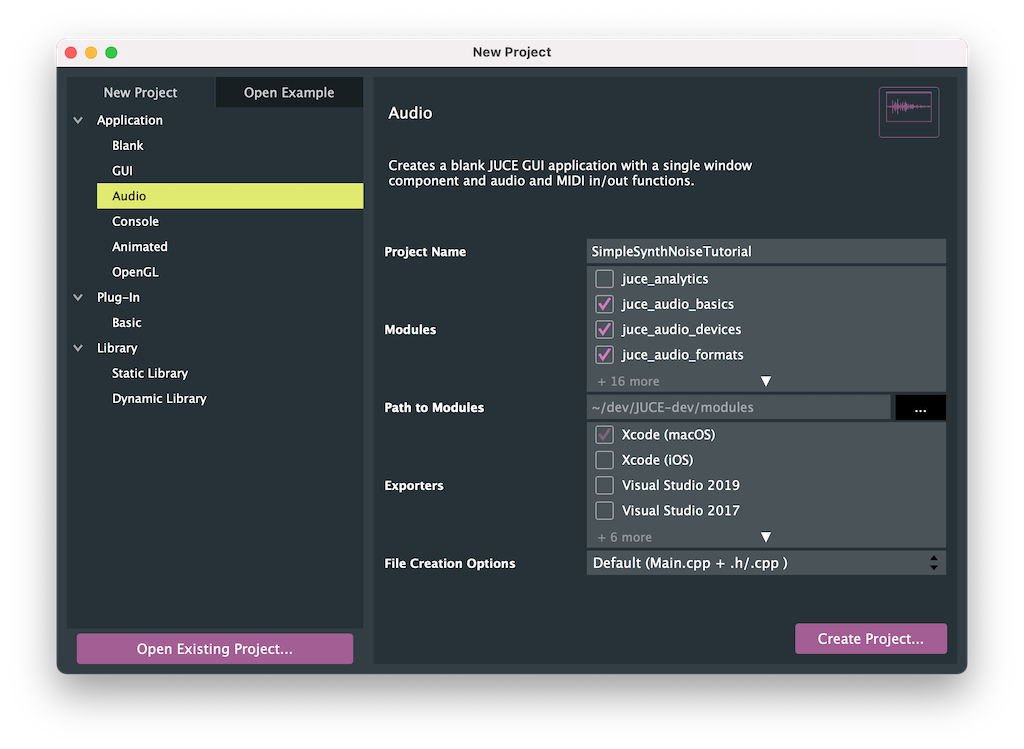
This is a useful starting point for your own audio applications in JUCE. The demo project synthesises white noise and plays it out of the target device's default audio hardware.
This tutorial implements only audio output. Audio input and real-time audio processing of audio input data are explored in other tutorials. The Audio Application template is very similar to the GUI Application template, except that:
MainContentComponent class inherits from the AudioAppComponent class rather than the Component class.juce_audio_utils module is added to the project, in addition to the other audio-related modules that are added to projects by default.The Audio Application template may be used for simple applications, such as the example provided here. It is also scalable for more complex applications, essentially any application that needs to interact directly with the target device's audio hardware. Creating audio plug-ins with JUCE is explored in other tutorials.
The AudioAppComponent class is an abstract base class, it has three pure virtual functions that represent the lifecycle of our audio application that we must implement in our derived class:
Of these three, the most important is perhaps AudioAppComponent::getNextAudioBlock(), since this is where you will either generate or process audio in your JUCE audio application. To understand how this works, we need to know a little about how modern computers generate audio. The audio hardware needs to generate a certain number of samples per channel for each second of audio. The CD-quality sample rate is 44.1kHz, which means there needs to be 44100 samples per second per channel sent to the audio hardware for playback. Rather than being passed to the audio hardware a single sample at a time, the samples are passed in buffers — or blocks — containing a certain number of samples. For example, at 44.1kHz and a block size of 441 our AudioAppComponent::getNextAudioBlock() function would be called 100 times per second.
Essentially, our AudioAppComponent::getNextAudioBlock() is servicing the audio callback of the audio hardware. It is important to note that this function will be called from another thread (the audio thread in most cases).
For our JUCE audio application to work correctly, there are two more important functions. This time we need to call them, rather than implement them:
Let's now explore our simple implementation of a noise generator by examining the life cycle of an audio application in more detail. Our constructor needs to set up the size of the Component object (see Tutorial: The main component). We also need to initialise at least one audio output:
As mentioned above, the call to the AudioAppComponent::setAudioChannels() function triggers the audio system to start up. In particular, it will call the prepareToPlay() function:
In this case we don't really need to do anything here, but as it is a pure virtual function we must implement at least an empty function. Here we log some useful information that we can gain about the audio system on the target device at this point. The samplesPerBlockExpected argument, as its name suggests, is the size (in samples) of the buffers of audio that we can expect to be asked for each time a buffer of audio is requested in our getNextAudioBlock() function. This buffer size might vary between callbacks, but it is a good indication. The sampleRate argument tells us the current sample rate of the hardware. We would need this if we were doing something that is frequency-dependent, such as synthesising tones (see Tutorial: Build a sine wave synthesiser) or using equalisation. We would also need to know the sample rate if we were using delay effects. We don't need this information to generate noise.
Soon after this call to our prepareToPlay() function the audio thread will begin requesting blocks of audio via the AudioAppComponent::getNextAudioBlock() function. This function is passed a single bufferToFill argument that is an AudioSourceChannelInfo struct. The AudioSourceChannelInfo struct contains a multichannel buffer of audio samples. It also contains two integer values that specify which region of this buffer should be processed on this call. In more detail, the AudioSourceChannelInfo contains the following members:
AudioSampleBuffer* buffer: An AudioSampleBuffer object is a multichannel buffer of audio data that is essentially a multidimensional array of float values. When our getNextAudioBlock() function is called, this buffer contains any audio data from the target device's audio input (if we requested audio input). When our getNextAudioBlock() function returns, we must have filled the relevant section of the buffer with audio that we want to play.int startSample: This is the sample index within the buffer where our getNextAudioBlock() function should start reading or writing audio.int numSamples: This is the number of samples in the buffer that should be read or written.Audio data stored as floating point values is very straightforward. Each sample of the audio signal is stored as a value that is nominally in the range ±1.0.
At a peak level of ±1.0 like this the output level will be very loud. In fact, this is the loudest the audio system will be able to generate without clipping. Typically, we will need to output audio that doesn't exceed this ±1.0 limit (although it is fine for intermediate stages of processing to go beyond this limit, as long as the final output is lower).
While the AudioSampleBuffer class is (at a very basic level) just a multichannel array of float values, it provides a useful set of functions for dealing with audio data. Many of these functions will be covered in later tutorials, but here we make use of the following functions:
float values at a specific sample offset.For our simple application to generate white noise, we need to fill the requested section of the buffer with random values. To do this we can iterate over the channels in the buffer, find the start sample within the buffer for that channel, and write the desired number of samples to the buffer:
Here we make use of the Random class in order to generate our random values (see Tutorial: The Random class). To generate white noise we need to generate uniformly distributed random numbers around zero. Here we generate random values between -0.125 and +0.125 by first calling the Random::nextFloat() function. This generates values between 0 and 1. Then we multiply the result of this by 0.25 and subtract 0.125. (See Tutorial: Control audio levels for more information on this process.) Notice that we didn't use the Random::getSystemRandom() function to get the shared system Random object, as shown in other tutorials (Tutorial: The Random class). This is because we are calling the Random::nextFloat() function on the audio thread. We need to create our own Random object otherwise the values might get corrupted by other threads using that shared Random object. To achieve this, an instance of the Random class is added to our MainContentComponent class:
When our application is closed, our destructor will be called. At this point we should call the AudioAppComponent::shutdownAudio() function:
Calling the AudioAppComponent::shutdownAudio() function will, in turn, cause the AudioAppComponent::releaseResources() function to be called. This is a good place to dispose of resources, if we allocated any during the running of our audio process (for example, if we allocated memory or opened some files). In this case, we didn't need any additional resources and we just log the function call with a simple message:
This tutorial has introduced the AudioAppComponent class, used by the Audio Application template, in order to generate audio. We have covered the following topics: