
Loading...
Searching...
No Matches
Learn the concept of zones and the conventions for zone layouts as defined in the MPE standard. Hook up your MPE synthesiser to an MPE-compatible device.
Level: Intermediate
Platforms: Windows, macOS, Linux
Classes: MPEZoneLayout, MPEZoneLayout::Zone, MPEMessages, MPESynthesiser
Download the demo project for this tutorial here: PIP | ZIP. Unzip the project and open the first header file in the Projucer.
If you need help with this step, see Tutorial: Projucer Part 1: Getting started with the Projucer.
The demo project is similar to the MPEDemo project in the JUCE/examples directory and builds upon the simplified version in Tutorial: Build a multi-polyphonic synthesiser. In order to get the most out of this tutorial you will need an MPE compatible controller. MPE stands for MIDI Polyphonic Expression, a specification that allows multidimensional data to be communicated between audio products.
Some examples of such MPE compatible devices are ROLI's own Seaboard range (such as the Seaboard RISE) and the BLOCKS range (such as the Lightpad Block).
With a Lightpad Block connected to your computer the window of the demo application should look something like the following screenshot:
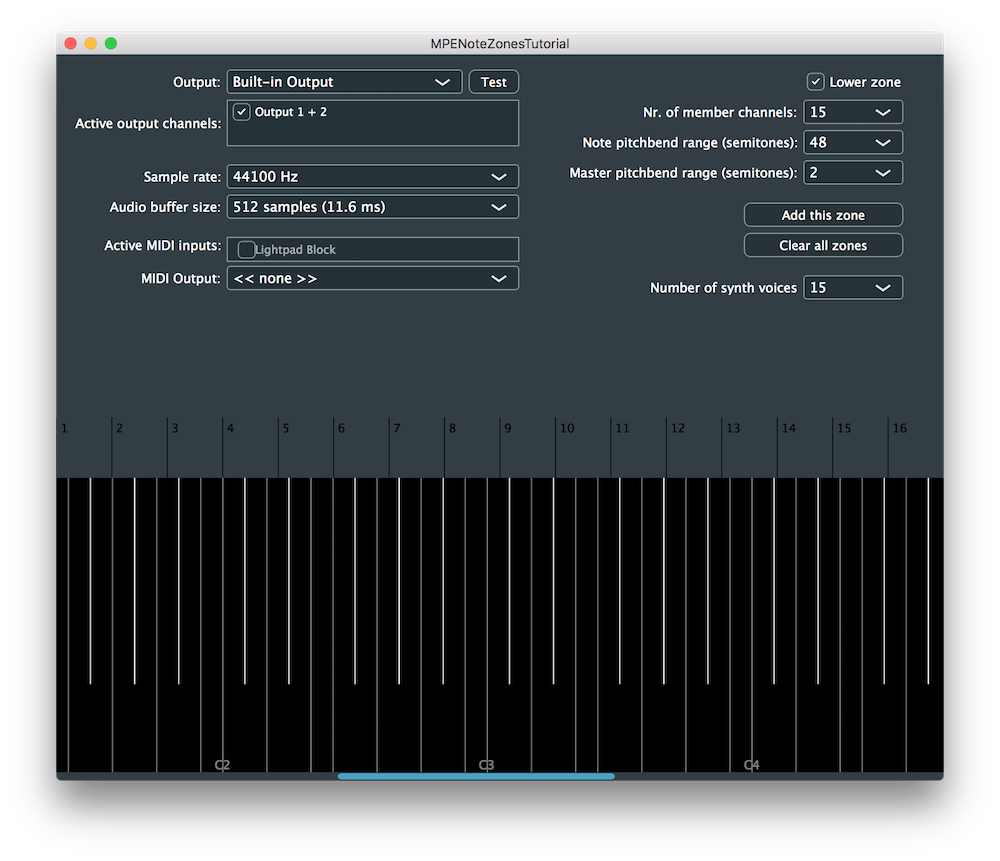
You will need to enable one of the MIDI inputs (here you can see a Lightpad Block is shown as an option).
Any notes played on your MPE compatible device will be visualised in the lower portion of the window as explained in the Tutorial: Build a multi-polyphonic synthesiser tutorial.
In the introductory tutorial Tutorial: Build a multi-polyphonic synthesiser, we were able to implement an MPE-compatible synthesiser easily by bypassing the standard MPE configuration process using legacy mode. In this tutorial, let's configure our synthesiser by following the procedure described in the latest MPE standard.
For the synthesiser to be able to determine whether we are working in MPE mode or not pertains to the notion of MPE zones. If at least one zone is defined using an MPE Configuration Message (MCM), then we are in MPE mode. Otherwise, if no zones are defined, then MPE mode is off. So what are zones?
The concept of zones is an MPE-specific term describing a group of contiguous MIDI channels comprising of one Master Channel and one or more Member Channels.
A Master Channel receives messages that apply to the entire zone whereas Member Channels receive messages that only apply individually.
In MPE, we can have at most two zones and they are defined as Lower and Upper zones.
A Member Channel can only belong to one zone at a time and the most recent MCM takes precedent over previous ones.
As an example, we can set the Lower Zone to contain channels 2 to 10 and the Upper Zone to contain channels 11 to 15.
Alternatively, we can also restrict ourselves to a single zone, using either the Lower or Upper Zone. However, it is recommended to use the Lower Zone by default. In a single zone scenario, the remaining unused Master Channel can be used as a Member Channel for the other zone, resulting in a maximum of 15 Member Channels.
An MPE zone can be turned off by sending an MCM without any member channels to the zone's master channel and MPE mode is therefore turned off when all zones are empty.
In JUCE, the implementation of a zone is encapsulated in the MPEZoneLayout::Zone struct and different zone configurations can be defined using the MPEZoneLayout class.
Zones are a useful means to provide different timbral characteristics using only one MPE controller and facilitates the propagation of MIDI messages across groups of channels using Master Channels.
There are mainly two MIDI modes that are supported with MPE: MIDI Mode 3 and 4.
MPE is designed to work properly using MIDI Mode 3 (Poly Mode) but can still be used using MIDI Mode 4 (Mono Mode).
Depending on whether a MIDI message is sent on a Master Channel or a Member Channel we will refer to them as Zone Level messages or Note Level messages, respectively. Some messages can be sent to both the Master Channel and Member Channels within a zone. When this happens, the receiving synthesiser has to combine both information in an appropriate manner.
Messages that must be sent as Zone Level are the following:
Messages that can be sent as Zone Level and Note Level are the following:
Messages that are usually sent as Note Level are the following:
These message levels are important to remember as they influence the design decisions when defining zones within your synthesiser.
Without legacy mode as implemented in Tutorial: Build a multi-polyphonic synthesiser, our synth will not output any sound until we configure at least one zone.
In the MPESetupComponent class, we add three button callbacks using lambda functions that allow creation and deletion of zones. We can either create lower and upper zones or clear all the zones in our zone layout.
When the user decides to set a zone, the setZoneButtonClicked() function is called as defined here:
We first create new local variables to store the lower/upper zone choice, the number of member channels, the zone level pitch bend and the note level pitch bend. We then set the Zone in our MPEZoneLayout object by calling the corresponding setLowerZone() or setUpperZone() function.
To handle the callback when clearing the zones, we simply call the clearAllZones() function on the MPEZoneLayout object which removes all the zones as follows:
Since the MPESetupComponent class acts as a broadcaster, we can register as a listener in the MainComponent class in order to receive callbacks when the zone layout has changed.
We can then override the corresponding functions to configure the synthesiser accordingly.
In the zoneChanged() callback, we set the newly-created Zone to the MPEZoneLayout member variable [1]. We can then pass the MPEZoneLayout object to the MPESynthesiser by calling setZoneLayout() on it [2]:
In the allZonesCleared() callback, we empty all zones in the MPEZoneLayout member variable [3]. We can then similarly pass the MPEZoneLayout object to the MPESynthesiser by calling setZoneLayout() on it [4]:
When the number of MPESynthesiserVoice objects is modified, we receive the numberOfVoicesChanged() callback which allows us to remove or add voices by respectively using the reduceNumVoices() and addVoice() functions on the MPESynthesiser object:
If we run the synthesiser, we are able to add lower and upper zones with a customisable number of member channels per zone.
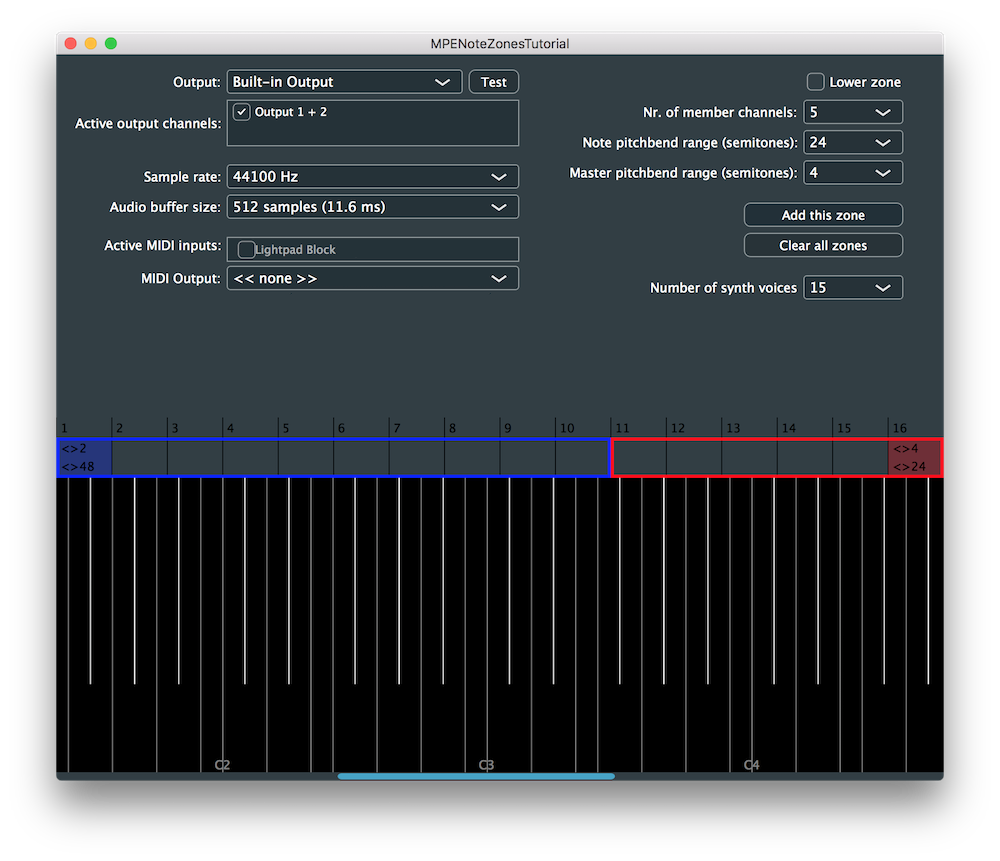
Try assigning different pitch bend sensitivities to the lower and upper zones and notice the impact on the pitch bend of notes assigned to a midi channel of a different zone.
MPEDemoSynthVoice class and crossfade between a triangle and a sawtooth waveform in response to the timbre parameter. MPEZonesTutorial_02.h file of the demo project.In this tutorial, we have learnt how to manage MPE zones and notes. In particular, we have: